Stop guessing and start solving: A systematic guide to identifying hidden humidity damage, preventing costly repairs, and creating a healthier home environment.
Excess humidity operates like a silent intruder in your home—seeping into walls, warping cherished furniture, triggering respiratory discomfort, and quietly accelerating structural decay. This comprehensive guide transforms confusion into clarity by mapping every humidity symptom to its precise origin and providing actionable, tiered solutions. You’ll learn to read your home’s moisture clues like a building diagnostician, implement fixes ranging from immediate interventions to permanent system upgrades, and protect both your property’s integrity and your family’s well-being through science-informed strategies grounded in building physics and material science.
Introduction
Walk into any older home after a week of rain, and you might notice it: that faint musty scent near the basement stairs, the slightly warped edge of a hardwood floorboard, condensation beading on a windowpane long after sunrise. These aren’t random annoyances—they’re your home communicating a moisture imbalance. Humidity problems manifest differently across climates and construction types, yet they follow predictable physical laws. Building science indicates that sustained indoor relative humidity above 60% can create conditions where organic materials degrade, microbial growth proliferates, and structural components weaken. Below 30%, equally challenging effects may occur—wood cracks, static electricity increases, and respiratory membranes dry out. For most climates and seasons, maintaining indoor relative humidity between 30% and 50% aligns with guidance from organizations like ASHRAE (American Society of Heating, Refrigerating and Air-Conditioning Engineers) and the EPA. This guide synthesizes established principles of moisture physics, material behavior, and practical home maintenance into a unified diagnostic system. Whether you live in a humid coastal region, a dry-climate area with seasonal monsoons, or a historic home with stone foundations, the framework ahead applies universally. We’ll move beyond generic advice like “buy a dehumidifier” to reveal exactly where moisture originates in each space, why specific materials respond under certain conditions, and how to implement solutions matched precisely to your home’s unique vulnerabilities. Understanding humidity isn’t about fighting nature—it’s about working with physics to create equilibrium.
The Humidity Diagnostic Framework: Your Three-Layer Action Plan
Before grabbing tools or purchasing products, pause. Most homeowners jump straight to symptom treatment—scrubbing mold, replacing warped trim—only to watch problems return weeks later. Why? They addressed the effect, not the cause. Humidity damage follows a clear pathway: Source → Pathway → Symptom. Break this chain at the source or pathway, and symptoms resolve sustainably. This three-layer framework, adapted from professional building diagnostics protocols, transforms overwhelming moisture issues into manageable puzzles. Apply it systematically to any humidity clue you observe.
Layer 1: Source Identification – Where Is Moisture Entering?
Moisture has four fundamental origins. Pinpointing which applies prevents misdirected effort.
- External Infiltration: Rain penetration through compromised roofs, window flashing failures, foundation cracks, or poorly sealed doors. Coastal homes face humidity-laden air; flood-prone areas deal with groundwater pressure. Diagnostic clue: Damage appears consistently after rain events, localized near exterior walls, windows, or foundation joints. Water stains often show directional flow patterns.
- Internal Generation: Everyday activities produce significant moisture. Showers, cooking, drying clothes indoors, breathing, and even houseplants contribute vapor. In tightly sealed modern homes (built for energy efficiency), this internally generated moisture has limited escape routes. Diagnostic clue: Problems concentrate in bathrooms, kitchens, laundry rooms; worsen during high-occupancy periods or colder months when ventilation decreases.
- Ground Moisture Migration: Soil naturally holds moisture. In basements and crawl spaces, vapor moves upward through concrete slabs (via capillary action) or porous foundation walls—a process called wicking. Unvented crawl spaces can retain moisture, affecting floor systems above. Diagnostic clue: Persistent dampness on basement floors/walls regardless of weather; musty odors strongest near floor level; rust on metal fasteners in subflooring.
- HVAC System Issues: Oversized air conditioners cool air rapidly but run too briefly to adequately dehumidify. Leaky ductwork in humid attics or crawl spaces pulls moist air into your system. Clogged condensate drains cause overflow. Diagnostic clue: High humidity persists even when AC runs; water pooling near indoor air handler; musty smell emanating from vents.
The Fundamental Principle: Moisture moves from areas of higher concentration toward lower concentration—and from warmer areas toward cooler surfaces. Your role is to interrupt this journey before materials are affected.
Layer 2: Symptom Mapping – Decoding Your Home’s Warning Signs
Don’t just see “mold.” Observe what kind, where it grows, and what surface it’s on. Each detail reveals the moisture story.
- Surface Condensation (Windows, Pipes, Ducts): Indicates air temperature dropped below the dew point at that surface. Common on single-pane windows in colder months, cold water pipes in humid seasons, or uninsulated AC ducts. Critical insight: Condensation itself isn’t the core issue—it signals a temperature/moisture imbalance. Ignoring it may lead to secondary damage (rot, mold) on surrounding materials.
- Efflorescence (White, Chalky Powder on Masonry): Mineral salts dissolved by water migrating through concrete or brick. When water evaporates at the surface, salts crystallize. Critical insight: Efflorescence confirms active moisture movement through the structure—not just surface dampness. It warrants attention to prevent potential surface deterioration if unchecked.
- Peeling Paint or Wallpaper: Moisture vapor pushing outward from within walls forces coatings to lose adhesion. Often appears as bubbling before peeling. Critical insight: If peeling occurs on interior walls with no visible water source, moisture may be trapped inside the wall cavity—requiring investigation beyond surface repair.
- Musty Odors: Caused by microbial volatile organic compounds (mVOCs) released during microbial activity on organic material. Critical insight: Odor location ≠ source location. Air currents carry mVOCs. A smell near a closet might originate from moisture within a wall cavity several feet away.
- Material Distortion: Warped wood floors (cupping upward at edges), swollen cabinet doors that stick, buckled vinyl flooring. Critical insight: Wood absorbs moisture until it reaches equilibrium with surrounding air. Sudden warping often signals a recent moisture event (leak, flood); gradual distortion suggests chronic elevated humidity.
Layer 3: Solution Tiering – Matching Response to Severity
Not every humidity issue requires major investment. Apply solutions proportionally:
- Tier 1: Immediate Mitigation (Do Today): Stop active damage. Wipe condensation, place fans on damp surfaces, remove saturated materials, run existing dehumidifier. Goal: Prevent escalation.
- Tier 2: Source Correction (Do This Week): Address the root cause. Seal a window leak, install bathroom exhaust fan timer, redirect downspout away from foundation. Goal: Eliminate moisture entry or excessive generation.
- Tier 3: Systemic Prevention (Do This Season): Upgrade home systems. Install whole-house dehumidifier, encapsulate crawl space, improve attic ventilation, replace single-pane windows. Goal: Create resilient, long-term moisture management.
Framework in Action: The Basement Window Scenario
Symptom: Musty smell and discoloration on drywall below a basement window.
Layer 1 (Source): After rain, water pools outside the window well. Cracked caulk around the window frame allows ingress. Ground moisture also migrates through the foundation wall.
Layer 2 (Symptom Mapping): Discoloration suggests prolonged moisture exposure. Drywall feels soft—indicating material compromise.
Layer 3 (Solution Tiering):
– Tier 1: Remove affected drywall section (wear appropriate respiratory protection), place dehumidifier and fan in area.
– Tier 2: Clean window well debris, install well cover, re-caulk window frame with appropriate sealant, apply exterior waterproofing membrane near window.
– Tier 3: Evaluate foundation drainage; consider interior drainage solutions if recurring; ensure downspouts extend sufficiently from house.
Result: Symptom resolved and recurrence risk reduced. Without Layer 1 analysis, surface cleaning alone would likely fail long-term.
This framework provides structure for observation and action. Carry it with you as we explore humidity’s impact room by room.
Humidity Problems and Solutions by Home Area
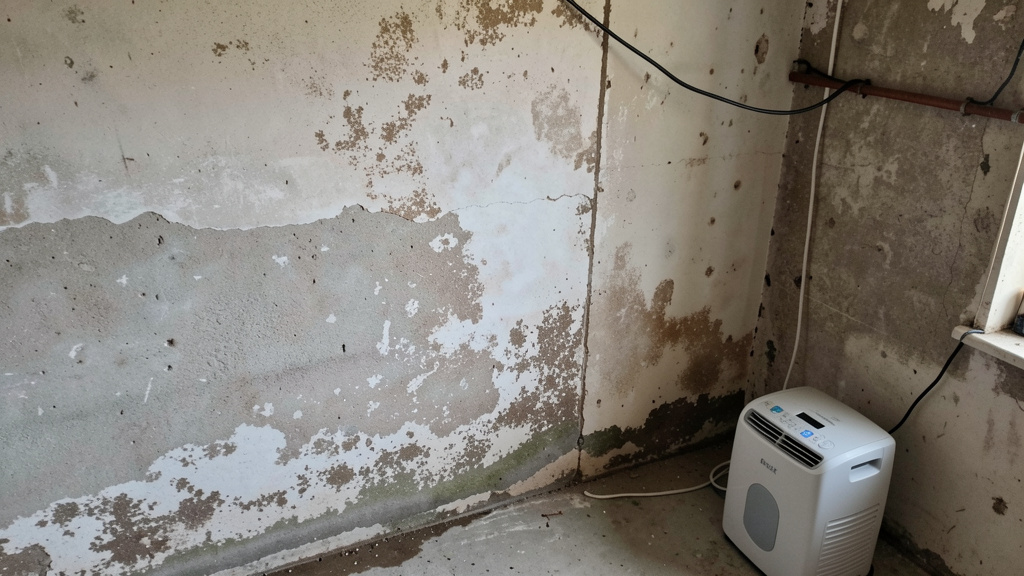
Basements and Crawl Spaces: The Ground-Level Consideration
Basements and crawl spaces interface directly with soil moisture, experience cooler temperatures (promoting condensation), and often lack active ventilation. Addressing moisture here supports structural integrity, indoor air quality, and stored belongings.
Problem 1: Persistent Dampness and Musty Odors
Why it happens: Concrete is porous. Even without visible leaks, moisture vapor migrates upward from soil through the slab and foundation walls. In crawl spaces with exposed earth, humidity release increases after precipitation. Cool basement air contacting warmer, moist soil can cause condensation.
How to confirm: Tape a 12″x12″ piece of plastic sheeting tightly to the basement floor or foundation wall. Wait 24 hours. If moisture appears under the plastic, vapor is migrating through the concrete. If moisture appears on top, humidity is condensing from the air.
Step-by-step fix:
1. Exterior First: Ensure gutters are clean and downspouts extend at least 6 feet from the foundation. Slope soil away from the house (approximately 6 inches drop over 10 feet).
2. Interior Vapor Barrier (Crawl Spaces): For dirt-floor crawl spaces, install a reinforced polyethylene vapor barrier (typically 20-mil thickness). Overlap seams generously, seal with waterproof tape, and extend up foundation walls. Secure edges properly. Pro tip: Light-colored barriers improve visibility during inspections.
3. Dehumidification: Place a dehumidifier rated for basement/crawl space conditions. Set to maintain approximately 50% RH. Ensure continuous drain capability (hose to sump pump or floor drain). Critical nuance: Standard dehumidifiers may struggle below 65°F. For unheated basements, select a model designed for cooler operation.
4. Air Sealing: Seal gaps where utilities (pipes, wires) enter the basement using appropriate sealants. This reduces humid outdoor air infiltration.
Common mistake: Installing a dehumidifier without addressing exterior drainage or vapor barriers. You’re managing air moisture while ignoring significant ground-source moisture—like bailing a leaky boat without addressing the leak.
Problem 2: Efflorescence and Surface Deterioration on Foundation Walls
Why it happens: Water dissolves salts within concrete or mortar. As moisture migrates to the drier interior surface and evaporates, salts crystallize as white powder (efflorescence). Repeated wet-dry cycles may cause surface concrete to flake (spalling), potentially exposing reinforcement.
How to confirm: Efflorescence rubs off easily with a dry cloth. Spalling shows as rough, pitted areas. Probe gently—if surface crumbles, active deterioration is present.
Step-by-step fix:
1. Dry Thoroughly: Run dehumidifier until wall feels dry to touch.
2. Remove Loose Material: Wire brush affected areas. Vacuum debris.
3. Apply Appropriate Sealer: Use a penetrating silane/siloxane sealer. These react chemically with concrete, repelling liquid water while allowing vapor transmission—critical to avoid trapping moisture. Apply per manufacturer instructions. For significant concerns, consult a foundation specialist.
Budget consideration: For minor efflorescence on non-structural walls, a diluted vinegar solution may dissolve surface salts. Note: This addresses appearance only—it does not stop the moisture source.
Temporary measure:* If reinforcement is exposed, apply a rust-inhibiting primer promptly. This is interim; professional assessment is recommended.
Problem 3: Microbial Growth on Stored Items or Structural Wood
Why it happens: Cardboard, fabric, wood furniture, and paper absorb moisture. When relative humidity remains elevated for extended periods, microbial growth may occur on susceptible materials. In crawl spaces, exposed floor joists become vulnerable.
How to confirm: Growth appears fuzzy (various colors). Musty odor intensifies near affected items. Use a moisture meter on wood joists—readings consistently above 20% indicate elevated risk.
Step-by-step fix:
1. Isolate and Remove: Wear appropriate respiratory protection, gloves, and eye protection. Remove affected items outdoors. For small areas (<10 sq ft) on non-porous surfaces, clean with detergent and water. Never mix cleaning chemicals.* For porous materials (drywall, insulation), removal is often necessary.
2. Dry Completely: Use fans and dehumidifier until area is thoroughly dry (wood moisture content stabilizes below 15%).
3. Prevent Recurrence: Store items in sealed plastic containers, elevated off the floor. Install vapor barrier in crawl space. Ensure adequate moisture control.
Critical safety note: If growth covers >10 sq ft, involves HVAC systems, or you have health concerns, consult a qualified remediation professional. Disturbing extensive colonies may aerosolize particles.
Ventilation Consideration: Crawl Space Management
Traditional advice recommended venting crawl spaces. Modern building science indicates this can increase moisture problems in many climates.
Why venting may be counterproductive: In humid climates, warm, moist outdoor air enters vents, contacts cooler surfaces (soil, joists), and condenses—adding moisture. In cold climates, vents allow freezing air near pipes.
Current widely accepted practice (per EPA and building research): Encapsulation. Seal vents. Install robust vapor barrier on floor and walls. Add dedicated dehumidification or integrate with home’s HVAC system. This creates a controlled environment. Exception: In consistently arid climates, passive venting may be sufficient—but monitor humidity closely with a hygrometer. Local climate and home-specific factors matter.
Bathrooms: Managing Steam and Moisture
Bathrooms generate intense, localized humidity spikes. A hot shower can significantly raise local humidity. Without rapid removal, moisture saturates walls, ceilings, and fixtures.
Problem 1: Discoloration on Ceiling and Walls Around Shower/Tub
Why it happens: Steam condenses on cooler surfaces (tiles, grout, ceiling). Grout is porous; moisture penetrates, potentially supporting microbial growth behind tiles. Poorly sealed tub surrounds allow water intrusion into wall cavities.
How to confirm: Press on wall near tub—softness may indicate water damage behind tile. Recurring discoloration in grout lines after cleaning suggests underlying moisture.
Step-by-step fix:
1. Exhaust Fan Protocol (Essential):
– During shower: Run fan before entering to establish airflow.
– After shower: Run fan for at least 20 minutes (use timer switch).
– Fan capacity: Minimum 80 CFM (cubic feet per minute) for standard bathrooms; higher for larger spaces. Verify airflow by holding tissue near grille—it should adhere firmly.
– Vent termination: Must exhaust outside, not into attic (a fire and moisture hazard). Check roof cap periodically.
2. Surface Maintenance:*
– Re-caulk tub/shower surround annually with appropriate sealant. Remove old caulk completely first.
– Apply grout sealer yearly to tile joints.
– Wipe down wet surfaces post-shower.
3. Repair (If damage exists): Remove affected material. Inspect framing for deterioration. Replace with moisture-resistant materials. Install appropriate barriers if needed for your climate.
Budget consideration: No exhaust fan? Open window and run portable fan blowing outward during/after shower. Less effective but better than no ventilation.
Common mistake: Using “mold-resistant” paint over existing growth. Paint seals in moisture and spores—they may grow behind* the paint, causing bubbling and further damage.
Problem 2: Foggy Mirrors and Condensation on Fixtures
Why it happens: Mirror surface temperature drops below dew point of humid air. Same physics causes water droplets on cold water pipes or metal fixtures.
How to confirm: Occurs consistently during/after hot showers; clears as room dries.
Step-by-step fix:
1. Prevention: Run exhaust fan before* shower starts.
2. Mirror Solutions:
– DIY anti-fog: Rub bar soap lightly on mirror, buff dry. Creates a temporary hydrophobic film.
– Commercial: Apply anti-fog product.
– Permanent: Install heated mirror or mirror with defogger.
3. Pipe Insulation: Wrap cold water pipes with closed-cell foam insulation. Prevents condensation and improves efficiency.
Pro insight: Foggy mirrors visibly indicate high humidity. If mirrors stay clear with fan running, ventilation is likely adequate. If not, fan capacity or ducting may need evaluation.
Problem 3: Peeling Wallpaper or Paint on Exterior Walls
Why it happens: Exterior walls are cooler than interior walls (especially in colder months). Moisture-laden bathroom air contacts this cold surface, potentially condensing within the wall cavity, and pushing wall coverings off the substrate.
How to confirm: Peeling occurs only on walls shared with outdoors; feels damp behind loose sections.
Step-by-step fix:
1. Immediate:* Limit bathroom use until repaired. Remove damaged wall covering.
2. Dry Cavity: Use dehumidifier and fans. Monitor with moisture meter until framing stabilizes.
3. Repair: Replace damaged substrate. Consider adding interior insulation after verifying ventilation is adequate—this raises the dew point temperature within the assembly, reducing condensation risk on the cold surface. Seal edges properly.
4. Prevent: Ensure exhaust fan is correctly sized and vented outside. Add weatherstripping to bathroom door to contain humid air.
Critical nuance: Adding insulation without* addressing ventilation may trap moisture. Ventilation must be verified first.
Kitchens: Managing Cooking Moisture
Kitchens generate significant moisture through boiling, steaming, and dishwasher cycles. Combined with heat, this creates conditions for condensation and interactions with cooking residues.
Problem 1: Residue on Range Hood Filters and Cabinet Undersides
Why it happens: Cooking releases moisture and aerosolized particles. Humid air carries particles, which condense on cooler surfaces (hood filters, cabinet bottoms near stove). Moisture mixes with residues, creating films that attract dust.
How to confirm: Sticky residue on cabinet undersides within proximity of stove; hood filters clogged with buildup.
Step-by-step fix:
1. Range Hood Protocol:
– Always run hood fan before cooking and for 15+ minutes after.
– Hood capacity: Minimum 300–400 CFM depending on range type. Duct must vent outside (recirculating hoods are less effective for moisture removal).
– Clean filters:* Metal mesh filters soak in hot, soapy water regularly. Replace filters per manufacturer guidance.
2. Surface Protection: Apply removable adhesive shelf liner to cabinet undersides near stove. Replace when dirty. Wipe surfaces regularly.
3. Strategic Ventilation: Open window opposite the stove while cooking to encourage airflow.
Budget consideration: No range hood? Position portable fan in window blowing outward during cooking. Cover pots while boiling.
Common mistake: Ignoring the ductwork. A powerful hood is ineffective if duct is obstructed, kinked, or terminates indoors. Inspect duct periodically.
Problem 2: Condensation on Windows Above Sink
Why it happens: Hot water from dishwashing creates localized steam. Single-pane or poorly insulated windows cool rapidly, causing condensation. Water drips onto sills, potentially promoting deterioration.
How to confirm: Water pooling on sill after dishwashing; frost on window interior in colder months.
Step-by-step fix:
1. Immediate:* Wipe condensation promptly. Place small towel on sill during dishwashing.
2. Window Upgrade: Consider replacing single-pane windows with double-pane low-E units. Low-emissivity coating helps maintain warmer glass surface.
3. Temporary Insulation: Apply removable window film kits seasonally. Creates an insulating air gap.
4. Behavioral Shift: Wash dishes with cooler water when possible. Run exhaust fan or open window during dishwashing.
Pro insight:* Condensation location offers clues. Upper pane condensation often indicates elevated indoor humidity. Lower pane condensation may suggest window surface is very cold (poor insulation) even if indoor humidity is moderate.
Problem 3: Warped Cabinet Doors Near Dishwasher
Why it happens: Dishwashers release steam during cycles. If door seal is compromised or unit isn’t fully closed, moisture escapes, saturating adjacent cabinet materials. Engineered wood products swell when wet.
How to confirm: Cabinet door sticks or won’t close smoothly; visible swelling near dishwasher; odor inside cabinet.
Step-by-step fix:
1. Dishwasher Check:* Inspect door gasket. Clean seal groove. Ensure dishwasher is level. Consider air-dry cycle instead of heat-dry if available.
2. Cabinet Repair: For minor swelling: Sand carefully. Apply wood glue to crack, clamp. For severe warping: Replace door.
3. Prevention: Install moisture barrier between dishwasher and cabinet during installation. Maintain small gap for airflow.
Temporary measure: Place silica gel desiccant packs inside affected cabinet. Replace or recharge packs regularly.
Living Areas and Bedrooms: Subtle Humidity Indicators
These spaces seem less vulnerable, but humidity issues here are often discovered late. Problems stem from hidden sources: unvented appliances, aquariums, indoor plants, or moisture migrating from other areas.
Problem 1: Musty Odors in Closets or Behind Furniture
Why it happens: Closets and furniture against exterior walls create areas with reduced airflow and cooler surfaces. Humidity may stagnate, allowing condensation on wall surfaces behind furniture, potentially supporting growth on drywall, insulation, or stored items.
How to confirm: Odor intensifies when opening closet door or moving furniture. Check wall behind furniture for discoloration or soft spots. Use moisture meter if available.
Step-by-step fix:
1. Airflow Restoration:* Pull furniture 2–3 inches away from exterior walls. Install louvered closet doors or keep solid doors open periodically. Place small fan inside large closets if needed.
2. Wall Inspection: If growth is found, follow remediation steps. Address the cause—likely insufficient insulation, air leakage, or whole-house humidity levels.
3. Moisture Control: Place silica gel containers or small rechargeable dehumidifier inside closets. For whole-room issues, ensure HVAC operates regularly; consider supplemental dehumidification.
4. Storage Protocol: Store seasonal clothing in sealed containers. Avoid cardboard boxes in damp-prone areas.
Critical insight:* Musty closet odors often signal broader humidity management needs or thermal performance issues at exterior walls—not just a closet-specific problem.
Problem 2: Buckled Hardwood Floors
Why it happens: Wood is hygroscopic—it expands when absorbing moisture, contracts when drying. Sudden humidity spikes (leak, flood) cause rapid expansion, forcing boards upward at edges (cupping). Chronic elevated humidity leads to gradual crowning. Low humidity causes gaps.
How to confirm: Use moisture meter on multiple floorboards. Cupping shows concave shape (edges higher); crowning shows convex shape.
Step-by-step fix:
1. Identify Source:* Check for plumbing leaks under floor, basement humidity issues, or recent water intrusion. Fix source first.
2. Control Environment: Run dehumidifier to bring RH toward 35–45%. Use fans to circulate air. Do not sand or refinish while wood is unstable—this may trap moisture.
3. Professional Assessment: For significant distortion, consult a qualified wood flooring professional. Minor cupping may reverse as wood stabilizes. Severe cases may require board replacement.
4. Prevention: Maintain consistent indoor humidity year-round (humidifier in dry seasons, dehumidifier in humid seasons). Acclimate new wood flooring properly before installation.
Common mistake: Sanding cupped floors immediately. Floors must stabilize at proper moisture content first.
Budget monitoring:* Place hygrometer in room with wood floors. Track seasonal changes. Target range: 30–50% RH.
Problem 3: Peeling Paint on Interior Walls (Non-Bathroom)
Why it happens: Often misdiagnosed as poor painting. Real cause: Moisture vapor migrating through the wall assembly from exterior (rain penetration) or interior (elevated humidity meeting cold wall). Paint loses adhesion as moisture accumulates behind it.
How to confirm: Scrape blistered paint—moisture or discoloration behind indicates vapor issue. Check if peeling occurs primarily on north-facing or exterior walls.
Step-by-step fix:
1. Source Hunt:* Inspect exterior wall for damaged siding, failed flashing, clogged gutters. Check interior for unvented appliances.
2. Wall Drying: Remove loose paint. Use dehumidifier and fans. Probe wall cavity cautiously (turn off power first if checking near outlets).
3. Repair: If moisture source is external: Repair siding/flashing. Apply appropriate waterproofer to exterior. If source is internal humidity: Improve whole-house ventilation/dehumidification. Prime repaired area with stain-blocking primer before repainting.
4. Paint Choice: Use vapor-permeable paint with mildewcide additive for susceptible areas. Avoid non-breathable coatings on potentially damp walls.
Pro insight: Peeling paint on multiple* interior walls often signals systemic humidity management needs—not isolated wall failure. Address whole-house conditions.
Attics and Roof Spaces: The Overlooked Zone
Attics experience extreme temperature swings. In colder months, warm, moist indoor air leaking into the cold attic may condense on roof sheathing—causing deterioration, growth, and insulation damage. In warmer months, poor ventilation traps heat and humidity.
Problem 1: Frost or Moisture on Roof Sheathing in Colder Months
Why it happens: Warm, humid air from living spaces escapes through ceiling gaps (recessed lights, attic hatches, plumbing vents). This air contacts cold roof sheathing, condensing as frost or moisture. During thaws, melting may drip onto insulation or ceilings below.
How to confirm: Visible frost/moisture accumulation on underside of roof boards during cold periods; water stains on ceiling below attic after warm spell.
Step-by-step fix:
1. Air Sealing (Critical Step):*
– Seal all penetrations between living space and attic: Use appropriate fire-rated sealants around wires, pipes, chimneys.
– Install ICAT-rated (Insulation Contact Air Tight) covers over recessed can lights.
– Weatherstrip attic hatch door; add insulation to hatch underside.
2. Ventilation Balance: Ensure adequate balanced ventilation: intake (soffit vents) and exhaust (ridge or gable vents). Maintain unobstructed airflow channels—install rafter vents (baffles) if insulation blocks soffits.
3. Insulation Check: Verify insulation hasn’t settled, blocking vents. Add insulation after air sealing is complete.
Common mistake: Adding more attic insulation without air sealing first. This may worsen condensation by making the attic colder while allowing moist air entry. Seal first, then insulate.
Safety note: Work in attic during daylight. Wear appropriate respiratory protection, gloves, eye protection. Walk only on ceiling joists.
Problem 2: Microbial Growth on Roof Sheathing or Insulation
Why it happens: Chronic condensation from air leakage or inadequate ventilation creates sustained dampness. Organic materials (wood sheathing, paper-faced insulation) become susceptible.
How to confirm: Discoloration on underside of roof boards; odor in attic; discolored, compressed insulation.
Step-by-step fix:
1. Safety First:* Wear full PPE (respirator minimum, goggles, coveralls). For large areas, hire qualified professionals.
2. Dry Thoroughly: Increase ventilation temporarily; use dehumidifier if accessible.
3. Clean Small Areas: On non-porous surfaces, use detergent solution. Do not sand or wire-brush moldy wood—it releases particles. For sheathing, HEPA vacuum followed by application of appropriate inhibitor may suffice if wood is structurally sound.
4. Replace Damaged Materials:* Remove and replace compromised insulation. If sheathing is soft or crumbles, replace affected sections.
5. Address Root Cause: Implement air sealing and ventilation fixes from Problem 1.
Critical nuance:* Growth on attic sheathing requires moisture source correction. Don’t ignore it.
Problem 3: Wet or Compressed Insulation
Why it happens: Condensation drips onto insulation, reducing effectiveness. Rodent activity or poor installation can also compress insulation.
How to confirm: Insulation feels damp or looks dark/stained; visibly thinner than adjacent areas.
Step-by-step fix:
1. Remove Wet Insulation:* Bag and discard immediately. Do not reuse.
2. Dry Cavity: Use fans and dehumidifier until wood framing is dry.
3. Replace: Install new insulation of appropriate type and R-value. For fiberglass batts, ensure vapor retarder (if present) faces downward toward living space. Consider upgrading to closed-cell spray foam in problem areas—it acts as air barrier and insulator.
4. Prevent Recurrence: Fix air leakage and ventilation issues causing moisture. Install moisture alarms near attic access points.
Budget tip:* When replacing batt insulation, choose unfaced (no paper backing) if adding over existing insulation to avoid unintended vapor barriers.
Material-Specific Responses: How Humidity Interacts with Building Components
Understanding how humidity interacts with specific materials empowers precise diagnosis and repair. Physics, not malice, drives these processes.
Wood: Dimensional Changes, Deterioration, and Pest Considerations
Wood’s cellular structure absorbs and releases moisture to match surrounding humidity—a process called equilibrium moisture content (EMC). At EMC consistently above 20%, decay organisms may become active. Simultaneously, elevated humidity attracts moisture-associated pests.
-
Dimensional Change Mechanisms:
- Cupping: Edges of board rise higher than center. Often caused by moisture absorption on bottom surface (e.g., basement floor exposed to slab moisture).
- Crowning: Center of board rises. Often caused by moisture absorption on top surface (e.g., spill not wiped promptly).
- Twisting: Spiral distortion along board length. May result from uneven drying or internal stresses released by moisture changes.
Repair Insight: Minor distortion may reverse if source is fixed and wood dries slowly. Severe distortion may require replacement. Sanding should only occur after wood stabilizes (verified by meter if possible).
-
Deterioration Types and Identification:
- Brown Rot: Turns wood dark brown, crumbly, with cubical cracking. Common in damp areas.
- White Rot: Turns wood yellowish-white, stringy/spongy.
- Dry Rot (Serpula lacrymans): Requires moisture to initiate; can spread through masonry. Causes significant structural damage. Rare but serious.
Critical Action: If deterioration is found, locate and eliminate moisture source first. Remove all compromised wood back to sound material. Treat adjacent wood with appropriate preservative. Replace with decay-resistant wood for vulnerable areas.
-
Pest Considerations: Termites, carpenter ants, and powderpost beetles thrive in moist wood. Humidity softens wood, facilitating excavation. A carpenter ant nest often indicates a pre-existing moisture problem. Prevention:* Keep wood debris away from foundation. Fix leaks promptly. Maintain indoor RH <50% where feasible. Inspect wood near moisture sources periodically.
Drywall and Paint: Bubbling, Peeling, and Surface Growth
Drywall (gypsum board) has a paper facing that absorbs moisture. Once saturated, gypsum core softens, losing integrity. Paint failures are usually symptoms of underlying moisture issues.
-
Failure Progression:
- Elevated humidity causes paper facing to absorb moisture.
- Paint loses adhesion, forming bubbles (blistering).
- Moisture penetrates to gypsum core, softening it.
- Microbial growth may occur on paper facing.
- Drywall sags, crumbles, or develops soft spots.
Diagnostic Tip: Press gently on suspicious area. Softness = core damage. Replacement is usually necessary.
-
Repair Protocol for Water-Affected Drywall:
- Stop Water Source: Fix leak first.
- Cut Out Damaged Section: Cut square/rectangle around damaged area, extending to nearest stud centers. Remove completely.
- Dry Cavity: Use fans/dehumidifier until framing stabilizes. Inspect for growth on studs—clean with detergent if minor.
- Replace: Install new moisture-resistant drywall for bathrooms/kitchens; standard for other areas. Apply appropriate primer to studs before installing new drywall.
- Finish: Tape, mud, sand, prime, paint. Use mildew-resistant paint in susceptible zones.
Critical Mistake: Patching small holes without addressing moisture source. Growth may continue behind patch.
-
*Paint Selection Guide:
- High-Humidity Areas (Bathrooms, Kitchens): Use 100% acrylic latex paint with mildewcide. Semi-gloss or gloss sheen sheds moisture better than flat.
- Exterior Walls (Prone to Condensation): Choose vapor-permeable paint to allow wall assembly to dry inward.
- After Remediation: Always apply stain-blocking primer before topcoat to prevent bleed-through.
Metal Components: Corrosion Considerations
Humidity accelerates electrochemical reactions on metal surfaces. Dissimilar metals in contact may accelerate corrosion. Coastal environments increase corrosion rates.
-
Common Failure Points:
- HVAC Drip Pans: Clogged drains cause standing water, leading to corrosion.
- Water Heater Tanks: Anode rod depletion allows tank corrosion.
- Fasteners in Framing: Rust stains on drywall may indicate moisture in wall cavity.
- Exterior Fixtures: Door handles, railings exposed to humidity and precipitation.
Prevention Strategy: Break the moisture-metal contact cycle.
-
Corrosion Management:
- Light Surface Corrosion: Scrub with wire brush or sandpaper. Wipe clean. Apply rust converter, then prime with rust-inhibiting primer, topcoat.
- Heavy Corrosion/Pitting: Replace component if structural (e.g., joist hanger). For non-structural items, specialized removal methods may apply.
- Preventive Coatings: Apply protective coatings to tools. Use dielectric grease on electrical connections. Choose stainless steel or hot-dipped galvanized hardware for moisture-prone areas.
Pro Tip: Place silica gel packs inside electrical boxes, toolboxes, or near stored metal items. Recharge packs periodically.
-
*HVAC-Specific Considerations:
- Drip Pan: Clean drain line periodically. Ensure pan slopes toward drain. Replace corroded pans promptly—overflow can cause water damage.
- Condenser Coils (Outdoor Unit): Rinse gently annually to remove debris buildup (coastal areas). Apply coil protectant if recommended.
- Ductwork: Seal leaks with mastic (not duct tape!) to prevent humid air infiltration. Insulate ducts in unconditioned spaces to prevent condensation.
Health Considerations: Humidity’s Impact on Indoor Living
Humidity’s influence extends beyond materials—it affects respiratory comfort, allergen levels, and sleep quality. Understanding these connections supports informed decisions.
Microbial Growth: Beyond Aesthetics
Visible growth releases spores and mVOCs (microbial volatile organic compounds). While most common household molds aren’t inherently toxic, certain types like Stachybotrys chartarum (often called “black mold”) can produce mycotoxins under specific conditions (prolonged saturation on cellulose-rich materials). However, any visible growth indicates moisture conditions requiring correction. Health effects vary by individual sensitivity and exposure level.
-
Reported Symptoms Associated with Exposure:
- Nasal congestion, sneezing, runny nose
- Eye irritation (itching, redness)
- Coughing, wheezing, throat irritation
- Skin rashes (especially in sensitive individuals)
- Aggravation of asthma or allergies
Critical Clarification: CDC and WHO note that while exposure correlates with respiratory symptoms, proving direct causation for specific illnesses is complex. Consensus guidance emphasizes: Eliminate visible growth and fix moisture sources to reduce potential health risks. Vulnerable populations (infants, elderly, immunocompromised, asthma sufferers) warrant extra attention.
-
Effective Prevention Protocol:
- Control Humidity: Maintain indoor RH 30–50% using dehumidifiers/HVAC where appropriate.
- Ventilate: Exhaust fans in bathrooms/kitchens vented outside; open windows when weather permits.
- Dry Promptly: Clean and dry water spills within 24–48 hours.
- Clean Regularly: Use HEPA vacuum on carpets/upholstery; damp-dust surfaces.
- Monitor: Place hygrometers in susceptible areas. Check periodically.
Myth Busting: “Air purifiers eliminate growth risk.” False. Purifiers capture airborne particles but do nothing for moisture sources or surface growth. Source control is paramount.
Dust Mites: Humidity-Dependent Allergens
Dust mites thrive at RH >50% and temperatures 68–77°F. They feed on shed human skin cells. While mites themselves aren’t harmful, their fecal pellets are a common allergen—triggering asthma, eczema, and allergic rhinitis.
- *Humidity Connection: Mites absorb moisture directly from humid air. Below 50% RH, populations decline. Below 40% RH, reproduction slows significantly.
- *Action Plan for Reduction:
- Bedding: Encase mattresses, pillows, duvets in allergen-proof covers. Wash bedding weekly in hot water (>130°F) if fabric allows.
- Humidity Control: Run dehumidifier in bedrooms; keep RH consistently <50% where feasible.
- Reduce Clutter: Minimize stuffed animals, fabric decor where mites breed.
- Vacuuming: Use vacuum with HEPA filter regularly. Consider hard-surface flooring in bedrooms.
Evidence-Based Insight: Studies indicate reducing indoor humidity below 50% can decrease dust mite allergen levels and improve symptoms in sensitive individuals.
Respiratory Comfort and Sleep Quality
Elevated humidity can make air feel “heavy,” increasing perceived breathing effort. It may also support survival of certain bacteria and viruses. Conversely, very low humidity (<30%) dries mucous membranes, potentially reducing their ability to trap particles.
- *Optimal Sleep Environment:
- Ideal bedroom humidity: 40–50% RH.
- Use hygrometer to monitor.
- Cool room temperature (60–67°F) combined with proper humidity supports sleep quality.
- For dry climates/winter: Use cool-mist humidifier with distilled water and clean daily to prevent microbial growth in unit.
- *Vulnerable Groups: Infants, elderly, and those with respiratory or cardiac conditions may benefit most from stable humidity control. Consult healthcare providers for personalized advice.
When DIY Isn’t Enough: Recognizing Professional Needs
Empowerment includes knowing your limits. Some humidity scenarios require specialized equipment, training, or licensing. Attempting complex repairs alone risks health hazards, structural compromise, or wasted resources.
Indicators for Professional Consultation
- Structural Concerns: Soft, spongy floors; visible sagging ceilings; cracks in foundation walls wider than 1/8 inch; doors/windows that no longer close properly. Who to consult: Licensed structural engineer or foundation repair specialist. They assess integrity and recommend solutions.
- Extensive Microbial Growth: Visible growth covering >10 square feet; growth inside HVAC systems; growth in wall/ceiling cavities requiring demolition; suspected specific types. Who to consult: IICRC-certified (Institute of Inspection, Cleaning and Restoration Certification) remediation company. They follow industry standards: contain work area, use HEPA air scrubbers, remove contaminated materials safely, verify cleanup.
- Significant Water Intrusion: Basement flooding >2 inches deep; sewage backup; roof damage from ice dams; burst pipe causing widespread saturation. Who to consult: Water damage restoration company (IICRC-certified). They deploy industrial equipment to dry structures rapidly—critical to prevent secondary issues. Act promptly: Insurance policies often require timely mitigation.
- HVAC System Concerns: Persistent high humidity despite AC running; odors from vents; ice buildup on evaporator coil; suspected refrigerant issues. Who to consult: Licensed HVAC technician. They diagnose airflow, refrigerant levels, duct leaks, and sizing. May recommend whole-house dehumidifier integration or duct sealing.
- Suspected Hidden Leaks: Unexplained high water bills; damp spots with no visible source; elevated moisture meter readings in wall cavities. Who to consult: Leak detection specialist. They use thermal imaging, acoustic devices, and moisture meters to pinpoint leaks non-invasively.
Vetting Professionals: A Due Diligence Approach
- Verify Credentials: Check IICRC certification for remediation/restoration firms. Confirm state licensing for contractors (HVAC, plumbing, structural).
- Insurance Verification: Request certificate of insurance for general liability and workers’ compensation.
- Written Scope of Work: Get detailed proposal including: specific tasks, materials, timeline, containment procedures (for remediation), moisture readings pre/post work, warranty. Avoid vague estimates.
- References and Reviews: Ask for recent client references for similar projects. Check BBB, Google Reviews.
- Payment Terms: Avoid 100% upfront payment. Standard is deposit, progress payments, balance due upon satisfactory completion.
- Avoid High-Pressure Tactics: Reputable professionals allow time for review. Be cautious of door-to-door solicitations after storms.
Critical Reminder: Take time to review proposals. Reputable professionals will not pressure immediate signing.
Collaborative Approach Strategy
You can still manage parts of the project to reduce costs:
– Before pros arrive: Remove furniture from affected area, extract standing water with wet/dry vac, run existing fans/dehumidifier. Document damage with photos/video for insurance.
– After pros complete core work: Handle cosmetic repairs yourself (painting, baseboard replacement) once area is certified dry and remediated.
– Prevention partnership: Hire pro for complex source correction (foundation waterproofing, duct sealing), then maintain with your own monitoring and dehumidification.
This approach leverages professional expertise where it matters most while keeping ongoing maintenance in your control.
Your Questions, Answered
Q: My hygrometer says 55% humidity. Is that too high?
A: 55% is at the upper edge of the generally recommended range (30–50%). Monitor for condensation on windows or musty odors. In colder months, aim for the lower end (30–40%) to reduce window condensation risk; in warmer months, 40–50% often feels comfortable. If you have respiratory sensitivities or notice moisture clues, take steps to reduce toward 50%.
Q: Can I just paint over mold to kill it?
A: No. Paint seals growth and moisture behind the coating, allowing activity to continue unseen. Growth will likely reappear. CDC and EPA guidance states: clean small areas with detergent/water after fixing the moisture source. Porous materials like drywall usually require replacement. Painting is the final step after remediation and thorough drying.
Q: Do dehumidifiers really work in basements? Which type should I buy?
A: Yes, when selected appropriately. Standard residential dehumidifiers may struggle below 65°F. For cool basements, select a model designed for cooler environments (often labeled for basement use). Size appropriately: approximately 70-pint capacity for 1,000 sq ft. Ensure continuous drain option. Place centrally, elevated off floor, with clear airflow. Run until RH reaches target, then use built-in humidistat.
Q: Why does my house feel humid even with the AC running?
A: Possible causes: 1) AC is oversized—it cools air quickly but cycles off before removing sufficient moisture; 2) Dirty air filter restricting airflow; 3) Low refrigerant charge; 4) Leaky ducts pulling humid air from attic/crawlspace; 5) Inadequate ventilation (cooking, showers adding moisture faster than AC removes it). Solution: Have HVAC technician check sizing, airflow, refrigerant, and duct integrity. Consider whole-house dehumidifier integration.
Q: Are silica gel packets effective for closets or small spaces?
A: Yes, for supplemental use in enclosed spaces (closets, cabinets, safes, toolboxes). They absorb moisture passively. For a standard closet, use several large reusable packets. Recharge monthly by baking per manufacturer instructions. For whole-room humidity control, use an electric dehumidifier—silica gel lacks capacity for open areas.
Q: How do I know if condensation on windows is a serious problem?
A: Occasional condensation on single-pane windows during extreme cold may be normal. Concerning signs: 1) Condensation between double-pane window panes (seal failure—replace window); 2) Persistent condensation causing water to pool on sills; 3) Frost forming on interior window surfaces; 4) Growth on window frames or adjacent walls. These indicate elevated indoor humidity or inadequate window performance requiring attention.
Q: Can houseplants significantly increase indoor humidity?
A: Minimally in typical home settings. While plants release moisture via transpiration, research indicates you’d need very high plant density to meaningfully raise whole-house humidity. One or two plants won’t significantly impact levels. However, overwatered plants in saucers can create localized damp spots. Tip: Empty saucers after watering; use pots with drainage holes.
Q: Is “dry rot” in my basement framing an emergency?
A: Yes. Despite the name, dry rot (Serpula lacrymans) requires moisture to initiate and is highly destructive—it can spread through masonry and compromise structural wood. Do not ignore. If structural integrity seems compromised, evacuate the area. Contact a licensed structural engineer and remediation specialist immediately. They will assess extent, eliminate moisture source, remove damaged wood, and treat surrounding areas.
Q: Will a whole-house fan help with humidity?
A: Only in specific conditions. Whole-house fans pull cool evening air through open windows, exhausting hot air. Beneficial in dry climates where nighttime air is cool and dry. Counterproductive in humid climates—it pulls moist outdoor air indoors, worsening humidity. In humid regions, rely on AC/dehumidification. Always check local humidity levels before use.
Q: How often should I check my home for humidity problems?
A: Implement a seasonal rhythm:
– Spring: Check basement/crawlspace after snow melt/rains; inspect exterior grading/downspouts.
– Summer: Monitor AC performance; check for condensation on ducts; clean range hood filters.
– Fall: Clean gutters; inspect roof for damage before winter; check attic ventilation.
– Winter: Watch for window condensation; ensure exhaust fans used during showers/cooking; check hygrometer readings.
Additionally, investigate promptly after any water event (leak, flood, storm).
Conclusion and Your 24-Hour Action Plan
Humidity management isn’t about achieving perfection—it’s about informed vigilance. You now possess a diagnostic lens to interpret your home’s moisture clues, a tiered solution framework to match responses to severity, and material-specific knowledge to prioritize repairs. The goal is resilience: creating systems that buffer against humidity extremes while supporting your home’s structure and your family’s well-being. Remember the core physics principle: moisture moves predictably. By controlling sources, managing pathways, and monitoring conditions, you shift from reactive concern to proactive stewardship.
Recap: Three Foundational Practices
- Measure Before You Act: Place hygrometers in basement, bathroom, and main living area. Know your baseline humidity. Data guides effective action.
- Source Over Symptom: Always ask “Where is this moisture coming from?” Fixing the source prevents recurring issues.
- Ventilate Strategically: Exhaust fans vented outside are essential in moisture-generating rooms. Run them longer than you might assume.
The 24-Hour Rule: Your Immediate Step
Within the next 24 hours, complete this single action: Place a hygrometer in your most humidity-prone room (likely basement or bathroom). Note the reading. If it’s above 55%, run your exhaust fan or dehumidifier for one hour and recheck. This simple act transforms abstract concern into concrete data—the foundation of all effective humidity management. You’ve just taken the most important step: moving from awareness to measurement.
The Big Picture: Humidity as a Home Health Indicator
View humidity control as part of your home’s holistic maintenance system—like checking fluid levels in a vehicle. Consistent monitoring and minor adjustments prevent significant issues. Share this knowledge with household members: encourage running the bathroom fan after showers, involve others in checking hygrometer readings. When humidity management becomes routine household practice, your home operates more efficiently, lasts longer, and provides a genuinely healthier environment for everyone within its walls. You haven’t just addressed problems—you’ve cultivated lasting home resilience.
Explore Our Complete System:
Understanding Home Ventilation: Exhaust Fans, HRVs, and Whole-House Strategies | Foundation Moisture Management: Interior and Exterior Approaches | The Complete Guide to Indoor Air Quality: Beyond Humidity | Choosing the Right Dehumidifier: Capacity, Features, and Placement | Seasonal Home Maintenance Checklist: Prevent Problems Before They Start | Wood Floor Care Mastery: Humidity Control, Cleaning, and Repair | Microbial Growth Prevention Protocol: A Room-by-Room Defense Strategy