Build Durable, Professional-Quality Surfaces for Patios, Foundations, Walkways, and More—Using Time-Tested Principles Grounded in Material Science and Practical Adaptation
Concrete is more than aggregate and paste—it’s a dynamic material that responds predictably to preparation, technique, and environmental conditions. Whether you’re setting a garden post, pouring a backyard slab, or crafting a functional countertop, understanding the principles behind each step transforms uncertainty into capability. This guide synthesizes established standards from the American Concrete Institute (ACI) and International Residential Code (IRC), alongside documented best practices in residential concrete work, to deliver a unified, adaptable workflow. No prior experience is required—only attention to detail, respect for the material’s behavior, and willingness to work with concrete’s natural processes. You’ll learn not just what to do, but how to recognize critical timing cues, adapt to real-world constraints, and avoid common pitfalls that compromise durability.
Introduction
Concrete work exists at the intersection of material science and hands-on craft. Success hinges on aligning human action with concrete’s chemical and physical behavior. For many DIYers, hesitation stems from fragmented advice lacking context: When exactly should I start floating? How do I know if my mix is too wet? What does “curing” really mean? This resource replaces ambiguity with clarity. Grounded in widely accepted engineering references and field-validated practices, it offers a structured yet flexible system. We emphasize observable cues—surface sheen, resistance to pressure, environmental conditions—so you can make confident decisions regardless of project scale. Mastery begins not with strength, but with understanding.
The Concrete Workflow Framework: Prepare, Place, Protect
Success unfolds across three interdependent phases. Preparation establishes conditions for quality. Placement executes with attention to concrete’s evolving state. Protection ensures long-term performance through proper curing. This framework isn’t rigid—it adapts to weather, project type, tools available, and experience level. Each phase contains critical decision points. Honor their sequence, observe the material’s feedback, and you build results that endure.
Phase 1: Preparation – Laying the Groundwork for Success
Professionals invest heavily here because errors made during preparation cannot be corrected later. This phase is about creating optimal conditions for concrete to perform as intended.
Site Assessment: Understanding Your Project’s Demands
Begin by clarifying purpose, environment, and constraints. A garden path faces different demands than a shed foundation. Ask these foundational questions:
- What is the intended use and load? Light foot traffic (paths, patios) typically requires concrete with compressive strength in the 2,500–3,500 psi range. Driveways or areas subject to vehicle loads benefit from 4,000 psi or higher mixes. Structural footings follow engineered specifications or local code requirements—always verify with your municipal building department. PSI (pounds per square inch) indicates resistance to crushing forces; higher values suit heavier demands.
- What is the soil condition? Clay soils retain moisture and expand when wet, potentially heaving slabs. Sandy soils drain well but may settle. Perform a simple percolation test: dig a 12-inch deep hole, fill with water. If it drains within 10–30 minutes, drainage is generally adequate. If water pools for hours, consider adding a gravel drainage layer or consulting a landscaping professional before proceeding.
- What slope is needed? Even gentle slopes prevent water accumulation. For patios adjacent to structures, slope away from the building at approximately 1/4 inch per foot of run. Use a 4-foot level with a small spacer block under one end to verify slope consistently across the area.
- What are current and forecasted conditions? Ideal pouring temperatures range between 40°F (4°C) and 90°F (32°C). Below 40°F, the hydration reaction slows significantly; freezing before initial set causes permanent damage. Above 90°F, rapid evaporation increases cracking risk. Check the 72-hour forecast—not just pour day. Wind accelerates surface drying; sustained winds over 15 mph warrant temporary windbreaks (plywood sheets, tarps on frames).
Illustrative scenario: A homeowner in a northern climate poured a small shed foundation in late autumn. Daytime temperatures reached 55°F, but overnight lows dipped near freezing. Without thermal protection during curing, the concrete experienced freeze-thaw stress before gaining sufficient strength. Cracks appeared within one season. Had they monitored minimum curing temperatures and used insulated blankets, the outcome would likely have differed. This underscores why preparation includes weather vigilance.
Tool and Material Readiness: Assemble Before You Begin
Gather and organize all tools before mixing starts. Mid-pour scrambles lead to rushed decisions. Group tools by function:
Mixing Zone:
– Heavy-duty wheelbarrow (steel preferred) OR mortar mixer (for projects exceeding 3–4 bags)
– Square-point shovel (efficient for scooping dry mix)
– Concrete hoe (for thorough hand-mixing)
– Bucket with clear measurement markings (critical for water accuracy)
– Garden hose with adjustable spray nozzle
Forming & Placement Zone:
– Straight, knot-free lumber for forms (2x4s or 2x6s)
– Stakes, duplex nails (for easy form removal later)
– Levels (4-foot and torpedo)
– String line and line level
– Hand tamper or plate compactor (for sub-base)
– Reinforcement: wire mesh (for slabs 4+ inches thick) or rebar (for driveways, structural elements), plus chairs to suspend it
Finishing Zone (arranged in order of use):
– Come-along (concrete rake) or flat shovel
– Screed board (straight 2×4 longer than pour width)
– Bull float (magnesium recommended for initial pass)
– Darby (wood or magnesium, 4–6 feet)
– Magnesium float
– Steel trowel (4–6 inch blade)
– Edger tool
– Groover tool (for control joints)
– Stiff-bristle broom (for texture)
– Spray bottle with clean water
Safety Zone (essential):
– Chemical-resistant gloves (nitrile; wet concrete is highly alkaline)
– Safety glasses with side shields
– N95 respirator (for mixing dry materials)
– Waterproof knee pads
– Long sleeves, long pants, and closed-toe boots (tuck pants over boots)
Adaptation notes:
– Budget-conscious: No bull float? Use the flat side of a darby. No dedicated edger? Carefully shape edges with a trowel at a 45-degree angle.
– Working solo: Pre-position finishing tools within easy reach of the pour area. Lean the screed board against the form before concrete arrives.
– Small projects (stepping stones): A sturdy plastic tub may suffice for mixing; a trowel replaces larger floats.
Sub-Base Preparation: The Foundation Beneath the Foundation
The layer beneath concrete is critical. Poor sub-base preparation is a leading cause of settlement, cracking, and uneven surfaces.
- Excavate: Remove topsoil and organic material (which decomposes and settles). Depth = desired slab thickness + 4 inches of compacted gravel base. For a standard 4-inch patio slab, excavate approximately 8 inches total.
- Compact: Use a hand tamper for small areas; rent a plate compactor for larger projects. Test compaction: step firmly on the soil. If your footprint sinks more than 1/4 inch, compact further. A stable base shouldn’t shift underfoot.
- Add gravel base: Use ¾-inch crushed angular stone (not rounded pea gravel, which shifts). Spread evenly to depth. Compact thoroughly. This layer improves drainage and provides uniform support. Slope the gravel base to match your intended slab slope.
- Moisten lightly: 30–60 minutes before pouring, lightly mist the gravel until damp—not soggy. A dry base draws moisture from the concrete’s underside, causing uneven curing. An overly wet base creates mud, weakening the bond.
Regional consideration: In regions with deep frost penetration, local codes often require footings to extend below the frost line (commonly 36–48 inches in northern U.S. zones). For slabs-on-grade in these areas, consult local requirements regarding perimeter insulation or deeper gravel bases to mitigate frost heave. Always verify with your local building department.
Formwork Construction: Precision Defines the Outcome
Forms shape the concrete and must remain rigid during placement.
- Select straight lumber: Sight down each board. Reject visibly warped pieces. Warped forms create uneven edges.
- Stake securely: Drive stakes every 2–3 feet outside the form. For slabs over 4 inches thick or on slopes, add diagonal braces. Test stability: push firmly on the form. It should not flex or shift.
- Level meticulously: Place your level on the top inside edge of the form. Shim underneath with small wood scraps until level. For sloped surfaces (driveways), use a story pole—a board marked with exact heights at intervals—to maintain consistent slope.
- Seal gaps: Concrete slurry can leak through tiny cracks, causing rough edges (“honeycombing”). Run a bead of caulk along the inside bottom edge where form meets ground. For smoother slab edges and easier stripping, line the inside of wood forms with plastic sheeting (smooth side facing the concrete).
- Position reinforcement: Place wire mesh or rebar after forms are secure but before pouring. Use plastic chairs to suspend reinforcement approximately halfway through the slab depth. Mesh should overlap 6 inches at seams; secure with tie wire. Never let reinforcement rest directly on the gravel base.
Common pitfall: Aligning forms by eye alone. Always stretch a taut string line along the intended edge. Align the top inside edge of the form precisely to this line. A small deviation at the form magnifies across the slab’s length.
The Guiding Principle: Concrete reveals preparation. Time invested in site assessment, tool readiness, sub-base compaction, and precise forming directly determines surface quality, structural integrity, and long-term performance. Rushing this phase introduces risks that finishing cannot fix.
Phase 2: Placement – Working With Concrete’s Changing State
Placement is a timed sequence guided by concrete’s physical state—not the clock. Learn to “read” the surface: its sheen, texture, and resistance provide real-time feedback for each step.
Recognizing Concrete’s Stages: Your Visual Timeline
These observable stages apply universally. Environmental conditions accelerate or delay them—always watch the material.
- Plastic State (0–60 minutes after water addition): Wet, fluid, easily shaped. Surface is glossy; bleed water (a thin layer of water) may appear. Ideal for pouring, screeding, and initial floating.
- Initial Set / Green Strength (60–180 minutes): Surface loses gloss. Light finger pressure leaves an impression but no water rises. Critical window for edging, grooving, and floating. This is when timing errors most commonly occur—working too early traps water; working too late tears the surface.
- Final Set (3–8 hours): Surface appears dull. Firm pressure leaves only a slight mark. No visible moisture. Curing must begin before this stage concludes.
- Hardened (24+ hours): Supports light foot traffic (after ~24 hours). Full strength develops gradually over 28 days.
Environmental influence: On a hot, windy day (85°F+, 20+ mph winds), the plastic state may last only 20–30 minutes. In cool, humid conditions (55°F, calm), it may extend beyond 90 minutes. Adjust your pace accordingly. Have finishing tools ready before concrete arrives.
Mixing: Achieving Workable, Durable Consistency
The water-to-cement ratio fundamentally influences strength and durability. Too much water creates a weak, porous matrix. Too little makes placement difficult and risks honeycombing.
Follow Bag Instructions Precisely: For an 80-lb bag of standard concrete mix, water requirements are typically 3–4 quarts (2.8–3.8 liters). Use a marked bucket—never estimate. Adding excess water (even one extra quart per bag) can reduce final compressive strength by as much as 25%, according to established concrete technology principles. Water enables hydration (the chemical hardening reaction), but excess water evaporates, leaving voids that compromise integrity and invite moisture damage.
Hand-Mixing (1–3 bags):
1. Pour dry mix into wheelbarrow. Create a crater in the center.
2. Add approximately ¾ of the recommended water. Mix dry ingredients inward using a chopping-and-folding motion with a hoe (avoid stirring, which traps air). Mix until uniform color with no dry pockets.
3. Add remaining water only if needed to reach “medium slump” consistency (see below). Mix 3–5 minutes total.
4. Consistency check: Scoop a handful. Squeeze firmly. It should hold together without water dripping between fingers. If it crumbles, add water drops at a time and remix. If soupy, it’s too wet—discuss options below.
Machine Mixing (4+ bags):
1. Add half the required water to the mixer drum first.
2. Add 3–4 bags of dry mix. Mix 2–3 minutes until uniform.
3. Gradually add remaining water while mixing. Stop when achieving medium slump.
4. Never add water after initial mixing is complete. If mix stiffens during use, remix without adding water—it often regains workability.
Understanding Slump (Workability):
– Low slump (1–3 inches): Stiff, holds shape well. Suitable for footings, curbs, or sloped surfaces where flow must be controlled.
– Medium slump (4–5 inches): Recommended for most DIY slabs. Smooth, plastic consistency—easy to place, screed, and finish while maintaining strength. Resembles thick oatmeal; holds a mound shape briefly when scooped.
– High slump (6+ inches): Very fluid. Avoid unless using a pump or specified for the application. High slump often indicates excess water, leading to segregation (aggregate sinking) and reduced durability.
Illustrative insight: A project poured with excess water for “easier placement” may appear smooth initially. However, within months, surface scaling (flaking) or random cracking often appears due to weakened paste and internal voids. Precision in mixing pays dividends in longevity.
Pouring: Strategic Placement for Uniformity
Pouring is deliberate placement—not dumping.
- Work in manageable sections: For slabs, pour in “bays” no larger than 10×10 feet. Complete finishing one bay before starting the next to avoid cold joints (weak seams between pours).
- Place gently: Shovel concrete from the wheelbarrow into the form cavity. Avoid dropping from heights over 2 feet, which can cause segregation. For deep footings, use a chute or tremie pipe to guide concrete downward.
- Consolidate: For critical placements (foundations, thick slabs), vibration eliminates air pockets. Use a pencil vibrator if available (insert vertically, hold 5–10 seconds until bubbles cease, withdraw slowly). DIY alternative: Rod vigorously with a ½-inch rebar piece—plunge up and down 10–15 times per square foot. Listen for the “hiss” of escaping air.
- Fill adequately: Pour until concrete sits 1–2 inches above the top of the forms. This provides material for screeding without exposing aggregate.
Project-specific notes:
– Footings: Pour continuously around the perimeter. If a pause is unavoidable, create a “keyway” (a groove in the unset edge) for the next pour to mechanically lock into.
– Countertops (standard mix): Pour in layers 1–1.5 inches thick, consolidating between layers. For integral sinks, position the mold first, then pour carefully around it.
– Vertical elements (small walls): Pour in lifts no more than 18–24 inches high. Wait 30–60 minutes between lifts to reduce pressure on forms.
Screeding: Establishing the Initial Plane
Screeding levels the surface to the exact height of the forms.
- Rest a straight 2×4 (longer than the pour width) on the top edges of opposite forms.
- With a partner (or using guide strips for solo work), pull the board toward you in a steady, slight sawing motion (forward-backward as you pull). Tilt the leading edge slightly downward to prevent dragging aggregate.
- Immediately fill any low spots revealed behind the screed with fresh concrete. Rescreed the area.
- Verify level across the surface with your level. Adjust high or low spots before proceeding.
Why it matters: Screeding sets the final elevation. Errors here are difficult to correct later. A surface significantly low in one area cannot be reliably built up with thin finishing passes, which create weak, delamination-prone layers.
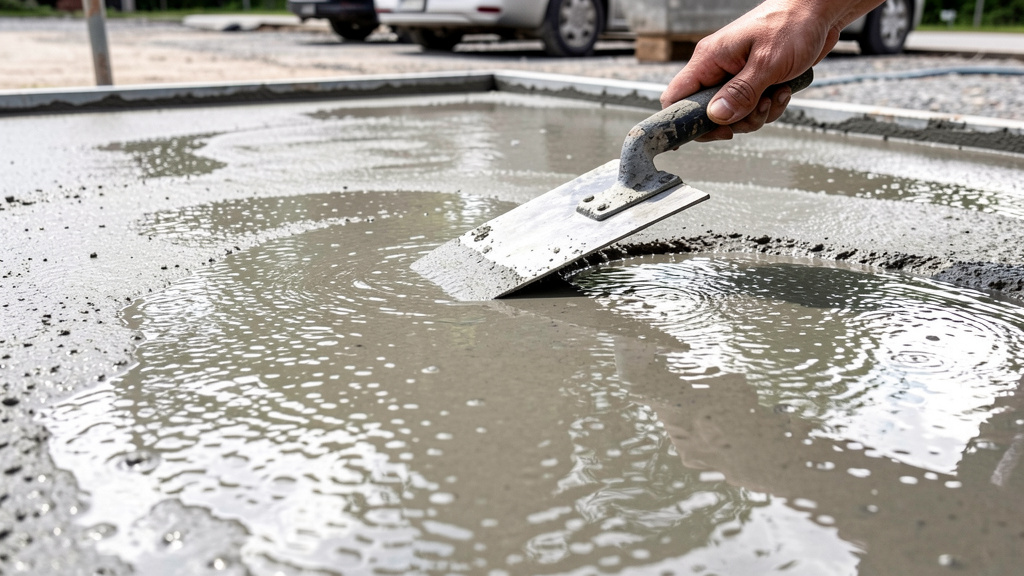
Floating: Sealing the Surface and Refining Texture
Floating follows screeding while the surface is damp but losing its gloss. Its purposes are essential:
– Embed exposed aggregate below the surface
– Close minor voids
– Bring cement paste to the top, creating a uniform “skin”
– Prepare for final finishing (troweling, brooming)
Bull Floating (First Pass):
– Use a magnesium bull float on a long handle. Magnesium provides a smoother initial pass than wood.
– Work in overlapping arcs with light, even pressure. Float with the direction of the pour.
– Goal: A uniformly damp surface with no visible stones or voids. Avoid over-floating, which brings excess water/laitance (a weak, dusty layer) to the surface.
Darby Pass (Recommended for Slabs):
– After bull floating, use a darby for broader smoothing. Pull in long, straight strokes across the entire surface.
– This further evens the plane and prepares for edging/grooving.
Timing cue: Begin floating when walking on the surface (with boots) leaves a 1/8-inch impression but no water rises around the sole. If water pools, wait. Floating too early traps bleed water beneath the surface, risking delamination later. Floating too late tears the fragile surface.
Edging and Grooving: Engineering Controlled Movement
These steps enhance durability and appearance—they are not merely cosmetic.
Edging:
– Run a concrete edger firmly along the junction where slab meets form. Apply steady pressure to create a consistent, rounded edge (approximately 1/4-inch radius).
– Purpose: Sharp corners are vulnerable to chipping from foot traffic, tools, or thermal movement. A rounded edge distributes stress and directs water away from the slab perimeter.
Grooving (Control Joints):
– Use a groover tool to cut shallow joints to a depth of approximately 1/4 the slab thickness.
– Placement guideline: Space joints no more than 2–3 times the slab thickness in feet. For a 4-inch slab, place joints every 8–12 feet. For irregular shapes (L-shaped patios), place joints at inside corners where stress concentrates.
– Pattern tip: Make joints straight and continuous. Avoid T-intersections; use “+” patterns where joints meet. Align joints with architectural features (doorways, column lines) when possible.
– Purpose: Concrete will crack as it cures and moves. Control joints create a planned weak point where cracks are likely to form—straight, hidden, and non-structural. Without them, cracks occur randomly, often through the slab’s center.
Pro tip: Cut grooves after the initial bull float pass but before the darby or final floating pass. This allows subsequent floating to gently smooth the groove edges, reducing the chance of chipping.
Final Finishing: Defining Surface Character and Safety
Choose the finish based on location, use, and climate.
Steel Troweling (Smooth, Dense Finish):
– Best for: Interior floors, garage slabs, countertops—areas requiring easy cleaning and a refined look.
– Process: Begin when surface is “thumb-print hard” (firm impression, no moisture). Hold steel trowel nearly flat. Make large, overlapping arcs with light pressure. First pass: smooth imperfections. Second pass (15–30 minutes later): refine. Third pass (optional): achieve a subtle sheen. Never trowel while bleed water is present—this traps moisture, causing dusting or scaling later.
– Climate note: In hot/dry conditions, lightly mist the surface with a spray bottle just before the final trowel pass to prevent “trowel burns” (dark, polished spots from friction heat).
Broom Finishing (Textured, Slip-Resistant):
– Best for: Patios, walkways, driveways, pool decks—any outdoor surface exposed to moisture.
– Process: After the darby pass (surface damp but holds shape), drag a stiff-bristle broom perpendicular to expected foot traffic. For a patio, broom toward the house entrance. Apply even pressure for consistent texture. Rinse the broom frequently in clean water.
– Texture check: Test on a small area first. Grooves should be 1/16–1/8 inch deep—enough for traction when wet, but not uncomfortable underfoot. Too light = slippery; too heavy = traps dirt.
Other Options:
– Wood Float Finish: Stop after the magnesium float pass. Leaves a subtle, organic texture ideal for rustic paths.
– Exposed Aggregate: Broadcast decorative stones onto fresh concrete; wash surface paste away after initial set (requires precise timing and often a chemical retarder—advanced technique).
– Stamped Concrete: Press textured mats into the surface during the floating stage. Requires release agents, coloring, and significant practice—best attempted after mastering basic finishing.
Critical reminder: Over-troweling creates a dense surface layer that traps moisture beneath it. In freeze-thaw climates, this significantly increases scaling risk. For exterior slabs in cold regions, a broom finish is generally more durable than a hard-troweled surface.
Phase 3: Protection – Curing for Long-Term Performance
Curing is not drying. It is the intentional maintenance of adequate moisture and temperature to allow the hydration reaction to proceed fully. Incomplete curing is a primary contributor to surface weakness, dusting, and premature cracking. Concrete gains strength through chemistry, not evaporation.
Why Curing Matters: The Science Simplified
Cement particles react with water to form interlocking crystals. This reaction requires sustained moisture. If the surface dries too quickly:
– Hydration halts at the surface, creating a weak, dusty layer
– A moisture gradient develops (wet inside, dry outside), generating internal stresses that cause cracking
– Final strength and durability are significantly reduced
Industry guidelines (such as ACI 308) recommend maintaining concrete at 50°F (10°C) or higher with high humidity for a minimum of 7 days for standard mixes, though specific project requirements may vary; always consult local building codes and mix specifications. Longer curing (up to 14 days) further enhances durability, especially for exterior or high-wear applications.
Practical Curing Methods for DIYers
Water Curing (Highly Effective):
– Method: Once the surface has reached final set (no longer wet to the touch, firm enough that light misting won’t mar it), cover with burlap, cotton sheets, or specialized curing blankets. Keep continuously damp for 7 days. Mist 3–5 times daily, more frequently in heat or wind. Weight edges to prevent wind lift.
– Why it works: Provides consistent moisture without thermal shock. Burlap holds water against the surface effectively.
– Adaptation: Clean old cotton bedsheets work well. Avoid placing plastic sheeting directly on fresh concrete—it can trap bleed water initially, causing discoloration or surface defects.
Curing Compounds (Convenient for Large Areas):
– Method: Spray or roll on a liquid membrane-forming compound (acrylic or wax-based) immediately after finishing is complete and surface water has disappeared. Forms a transparent film that seals in moisture.
– Pros: Labor-efficient; no re-wetting needed.
– Cons: May interfere with future coatings (paint, epoxy); requires even application; less effective in extreme heat. Choose “non-yellowing” formulas for light-colored concrete.
– Application tip: Apply two light coats at right angles for complete coverage. One heavy coat may crack or peel.
Plastic Sheeting (Use Thoughtfully):
– Method: Place 6-mil polyethylene sheeting over damp burlap or curing blankets (never directly on fresh concrete). Seal edges with soil, sandbags, or boards.
– Purpose of burlap layer: Prevents “water spotting” (condensation droplets etching the surface) and promotes even moisture distribution. Direct plastic contact often causes uneven curing and surface blemishes.
– Best suited for: Cold-weather curing (traps ambient heat) or situations where frequent re-wetting isn’t feasible.
Cold Weather Considerations (<50°F / 10°C):
– Goal: Maintain concrete temperature above 50°F for at least 48 hours.
– Methods: Insulated curing blankets (thermal mass), temporary heated enclosures (with ventilation to prevent carbonation), or embedding heating cables (for critical projects). Never use unvented propane heaters or open flames near curing concrete—combustion byproducts can react with the surface, causing dusting.
– Monitoring: If possible, use a concrete thermometer probe embedded 1–2 inches deep. Check temperatures periodically.
Hot Weather Strategies (>85°F / 30°C):
– Goal: Slow evaporation; prevent plastic shrinkage cracks.
– Methods: Pre-cool mix water (use ice chips); shade the sub-base and forms before pouring; mist aggregates lightly; apply an evaporation retarder spray during finishing (follow product instructions); begin curing immediately after final set with wet coverings and shade cloth.
– If cracks appear while finishing: Stop work. Lightly mist the surface. Wait 10–15 minutes—often, the cracks will “heal” as the surface rehydrates. Then resume floating. Do not trowel over active cracks.
Curing Timeline and Post-Cure Care
- First 24 hours: Keep covered and completely undisturbed. Do not walk on concrete. Even light foot traffic can cause surface marring or micro-cracks. Post clear “WET CONCRETE” signs.
- 24–48 hours: Light foot traffic may be possible if the surface is hard (no indentation from a thumb press). Remove forms only when edges are firm (typically 24–48 hours for non-structural slabs). Test by gently pressing a fingernail into the edge—it should leave only a faint mark. Pry forms away carefully to avoid chipping.
- 3–7 days: Continue active curing. For driveways, wait at least 7 days before allowing passenger vehicles. Wait 28 days before parking heavy vehicles (trucks, RVs).
- 28 days: Concrete reaches approximately 90% of its design strength. Full strength development continues slowly over months, but 28 days is the standard benchmark for service loads.
Illustrative note: A homeowner removed patio forms after only 12 hours on a warm day. The still-soft edges crumbled when brushed during cleanup. Repairing required patching, leaving a visible imperfection. Waiting the additional 12–24 hours would have preserved the edge integrity. Patience during curing protects your effort.
Long-Term Maintenance for Durability
- Sealing (Optional but Beneficial): After 28 days, once the surface is clean and fully dry, apply a penetrating sealer (silane/siloxane based). These sealers repel water and chlorides without forming a surface film. Reapply every 2–5 years per product instructions. Avoid film-forming sealers (acrylics) on exterior slabs in freeze-thaw climates—trapped moisture can cause blistering or spalling.
- Joint Care: After 30 days, fill control joints with a flexible polyurethane caulk to prevent weed growth and water intrusion beneath the slab.
- Winter Precautions: Minimize use of de-icing salts. If needed, calcium chloride is generally less damaging than sodium chloride (rock salt), but sand provides traction without chemical risk. Shovel carefully—avoid metal edges that can chip concrete.
- Cleaning: Sweep regularly. For stains, use pH-neutral cleaners. Avoid acid washes unless absolutely necessary (and neutralize thoroughly afterward with baking soda solution).
Adapting the Workflow: Project-Specific Guidance
The core principles apply universally, but execution varies. These adaptations ensure relevance across common DIY scenarios.
Pouring a Residential Slab (Patio, Walkway)
- Thickness: 4 inches minimum for patios and walks; 5–6 inches recommended for driveways.
- Reinforcement: Wire mesh (W1.4 or W2.1) suspended on chairs is suitable for patios. For driveways, #3 rebar spaced 18 inches on center provides greater crack resistance.
- Slope Verification: Use a laser level or water level for accuracy over longer distances. Confirm slope away from structures.
- Finishing Choice: Broom finish is strongly recommended for safety on all exterior walking surfaces.
- Expansion Consideration: Where new slab meets an existing structure (house foundation, garage), install a pre-formed expansion joint strip (foam or fiberboard) to allow independent movement and prevent cracking.
Setting Structural Posts (Fence, Mailbox, Deck Support)
- Footing Depth: Must extend below the local frost line to prevent heaving. This depth varies significantly by region (e.g., 12 inches in southern zones, 48+ inches in northern zones). Always verify with your local building department.
- Hole Diameter: Typically 3 times the post width (e.g., 12-inch diameter hole for a 4×4 post).
- Mix Selection: Fast-setting concrete offers convenience for small jobs (follow package water instructions precisely). For critical structural posts (decks, pergolas), standard concrete mix with strict water control and full curing protocol provides superior long-term strength.
- Technique: Place 4–6 inches of gravel in the hole bottom for drainage. Set post on gravel. Use temporary diagonal braces (2x4s nailed to post and secured to stakes) to hold plumb in both directions. Pour concrete, consolidating thoroughly around the post. Slope the concrete surface away from the post base to shed water. Do not backfill soil against the curing concrete—wait at least 48 hours.
Crafting a Concrete Countertop (Simplified Approach)
- Mix Selection: Use a pre-blended countertop mix (formulated with finer aggregates and polymers) for best results. If mixing your own, a common ratio is 1 part Portland cement, 2 parts sand, 3 parts fine crushed granite (¼-inch max), with acrylic fortifier liquid replacing 10–15% of the mix water.
- Form Construction: Use melamine-coated particleboard for smooth faces. Seal all seams thoroughly with silicone caulk. Apply a mold release agent (mineral oil or commercial release) generously to all surfaces contacting concrete.
- Reinforcement: Embed fiberglass mesh (not wire mesh) in the bottom third of the slab thickness. For overhangs exceeding 6 inches, include stainless steel rods for support.
- Placement & Consolidation: Pour in layers 1–1.5 inches thick. Consolidate between layers. Vibration is critical for eliminating air bubbles. A palm sander with a wood block taped to the base can serve as a DIY vibrator—run it along the outside of the form walls.
- Demolding: Wait at least 48 hours. Gently tap form walls with a rubber mallet before prying. Sand sharp edges lightly with 80-grit sandpaper.
- Curing: After demolding, wrap the entire slab tightly in plastic sheeting for 7 days. Then allow to air-cure in a shaded, protected area for an additional 14–21 days before sealing.
- Sealing: Use a food-safe, penetrating sealer (silicate-based) followed by a food-grade wax. Re-seal annually or as recommended by the product manufacturer.
Addressing Common Repairs
- Hairline Cracks (<1/16 inch): Clean thoroughly with a wire brush. Fill with a flexible concrete crack sealant. These are typically cosmetic and not structurally concerning.
- Active or Widening Cracks: May indicate underlying issues (settlement, poor base, structural overload). Consult a qualified professional before attempting repair.
- Spalls (Surface Chunks Missing): Chisel out all loose material down to sound concrete. Clean the cavity thoroughly. Apply a concrete bonding adhesive to the exposed surfaces. Patch with a polymer-modified repair mortar, feathering edges smoothly to blend with the surrounding surface. Cure the patch meticulously—cover with plastic or damp cloth for several days.
Safety: Protecting Yourself During Concrete Work
Concrete work involves significant hazards. Proactive safety measures are non-negotiable.
Chemical Burn Prevention
Fresh concrete has a high pH (12–13) and is caustic. Skin contact can cause severe burns, often with delayed symptoms (redness, blistering appearing hours later).
– Prevention: Wear chemical-resistant gloves (nitrile), long sleeves, long pants, and waterproof boots. Tuck pants over boot tops to prevent concrete entry.
– First Aid: If contact occurs, flush immediately with clean, running water for at least 15 minutes. Remove contaminated clothing carefully. Seek medical attention promptly—even seemingly minor exposure warrants evaluation. Never ignore concrete residue on skin or clothing.
Silica Dust Awareness
Dry cement, sand, and concrete dust contain crystalline silica. Inhalation can cause silicosis (permanent lung scarring) and increases lung cancer risk.
– Prevention: Wear an N95 respirator during all dry mixing and handling. Mix in well-ventilated areas. Dampen dry materials slightly before handling if feasible. Consider pre-mixed wet concrete for small projects to minimize dust.
– Tool Note: Avoid dry-sanding cured concrete. Use wet-sanding methods or tools equipped with HEPA-filtered vacuum systems.
Physical Safety Practices
- Lifting: Bend at the knees, keep back straight. An 80-lb bag is heavy—get assistance or use a hand truck. Mix only the amount you can place within 15 minutes to avoid rushed, unsafe handling.
- Tool Handling: Keep sharp tool edges covered when not in use. Store trowels blade-down in a dedicated bucket. Be mindful of tripping hazards from hoses, cords, or tools.
- Work Environment: Maintain awareness of surroundings—overhead wires, uneven ground, weather changes. For pours requiring extended time, work with a partner whenever possible. Stay hydrated, especially in warm weather.
Your Questions, Answered
Q: Can I pour concrete if rain is in the forecast?
A: Light rain after the concrete has reached final set (surface hard, no moisture visible) can actually aid curing. However, rain during pouring or finishing washes away cement paste, weakens the surface, and causes pitting. Heavy rain on a freshly poured slab is problematic. If rain is imminent, postpone pouring. If caught mid-pour, cover immediately with plastic sheeting supported by frames (so plastic doesn’t touch the surface). Remove carefully once rain passes. Never pour onto a rain-soaked or muddy sub-base—wait for it to drain and stabilize.
Q: What should I do if my mixed concrete is too wet?
A: Prevention is ideal—measure water precisely. If already mixed and excessively wet (soupy), do not add dry cement or mix (creates weak, inconsistent spots). Let it sit undisturbed in the wheelbarrow for 10–15 minutes; some bleed water may be reabsorbed. If still too wet, consider using it for a non-structural application where strength isn’t critical (e.g., filling a deep void). For your primary pour, discard the batch and remix correctly. Wasting one bag is far less costly than compromising the entire project’s integrity.
Q: Why is my concrete developing fine cracks while still wet?
A: These are “plastic shrinkage cracks,” caused by rapid surface moisture loss due to sun, wind, or low humidity. Immediately mist the surface lightly with water, then cover with damp burlap or an evaporation retarder spray. Continue curing diligently. For future pours: schedule work during cooler parts of the day, use windbreaks, pre-dampen the sub-base (without creating mud), and begin curing procedures before the concrete reaches final set.
Q: When is it safe to remove the forms?
A: For non-structural slabs (patios, walks), forms can typically be removed after 24–48 hours if edges are firm. Test by gently pressing a fingernail into the slab edge—it should leave only a slight mark without crumbling. For structural elements (footings, foundation walls), wait at least 3 days, or follow engineered specifications. In cooler temperatures (<60°F), extend removal time by 25–50%. Always remove forms carefully: pry gently from the outside to avoid chipping the concrete edges.
Q: What’s the difference between cement, concrete, and mortar?
A: Cement (typically Portland cement) is the fine powder that acts as the binder. Concrete is a mixture of cement, water, sand, and coarse aggregate (gravel or crushed stone)—used for slabs, footings, and structural elements. Mortar is cement, water, and sand (no coarse aggregate)—used for bonding bricks, blocks, or stone. Using mortar for a slab would lack the necessary strength and durability. Always select the product formulated for your specific project.
Q: How can I add color to my concrete project?
A: Options include:
– Integral color: Powder or liquid pigment mixed thoroughly into the entire batch (most uniform, won’t fade). Follow the manufacturer’s dosage instructions precisely.
– Acid staining: A chemical reaction with cured concrete creating translucent, variegated effects (requires skill and safety precautions; less DIY-friendly).
– Concrete dyes: Water- or solvent-based colors applied to the surface (less durable than integral color).
For beginners, integral color is the most reliable. Always test a small batch first—colors appear significantly darker when wet and may vary slightly when cured.
Q: Is it possible to pour new concrete over existing concrete?
A: Yes, but preparation is critical. The existing surface must be clean, sound (no cracks, spalls, or loose material), and properly profiled (roughened). Remove all oil, grease, paint, or sealers using a concrete etcher or mechanical scarifier. Immediately before pouring the new layer, apply a bonding adhesive specifically designed for concrete-to-concrete applications. The new layer should be at least 2 inches thick. For thinner applications (<2 inches), use a polymer-modified topping mix engineered for overlays.
Q: Why is my cured concrete surface dusty or powdery?
A: This “dusting” is commonly caused by:
1) Excess water in the original mix
2) Troweling while bleed water was present on the surface
3) Inadequate or interrupted curing
4) Carbonation from unvented heaters used during cold-weather curing
Prevention during placement and curing is key. For existing dusting, apply a concrete densifier (sodium or lithium silicate) which penetrates and reacts to harden the surface layer. Severely dusting surfaces may require grinding and application of a cementitious overlay.
Q: How can I prevent or remove efflorescence (white, powdery deposits)?
A: Efflorescence is soluble salts brought to the surface by moisture. Prevention: Use low-alkali cement if available, minimize mix water, ensure proper site drainage away from the slab, and apply a penetrating sealer after full cure. Removal: For existing deposits, scrub with a stiff nylon brush and a mild solution of white vinegar and water (1 part vinegar to 3 parts water). Rinse thoroughly with clean water. Avoid strong acid washes unless absolutely necessary, and always neutralize afterward.
Q: Is renting a power mixer worthwhile for a DIY project?
A: For projects requiring more than 3–4 bags of concrete, renting a mortar mixer ($40–$70/day) is highly recommended. Hand-mixing larger quantities often leads to inconsistent blends, physical fatigue, and rushed placement—all compromising quality. A mixer ensures uniformity, saves significant time and effort, and allows you to focus on placement and finishing. Factor the rental cost into your project budget; it’s an investment in a better outcome and reduced physical strain.
Q: What is the lowest safe temperature for pouring concrete?
A: Ambient temperatures should remain above 40°F (4°C) during placement and for the initial curing period. Below this, hydration slows dramatically; freezing before initial set causes irreversible damage. If pouring in cool conditions is unavoidable:
– Use warm (not hot) mix water
– Pour during the warmest part of the day
– Use set accelerators only if appropriate for the application (note: calcium chloride accelerators are not recommended for reinforced concrete or where surface discoloration is a concern)
– Insulate forms and cover the slab immediately after finishing with thermal blankets
– Monitor temperature closely for the first 48 hours
When conditions are marginal, postponing is often the most economical choice. Patience prevents costly failures.
Q: How can I assess if my DIY concrete project is structurally sound?
A: For non-structural projects (patios, walks, stepping stones), visual and tactile checks after 7 days provide reasonable assurance: surface should not dust when rubbed firmly, edges should be intact without crumbling, control joints should have cracked cleanly (not randomly), and the surface should support light foot traffic without marking. For any structural application (foundations, footings supporting decks or structures, retaining walls), rely on proper mix design, precise water control, thorough placement, and diligent curing per engineered specifications. When structural integrity is critical, consult a qualified professional or use pre-cast concrete elements certified for the load. Never guess with structural elements.
Conclusion: Building Confidence Through Understanding
Mastering concrete isn’t about achieving perfection on the first attempt—it’s about understanding the reliable principles that transform effort into lasting results. You now have a adaptable framework: prepare thoroughly with attention to site and conditions, place concrete while observing its changing state, and protect it diligently through proper curing. Remember the three foundational practices that prevent most common issues: measure water precisely, never skip curing, and prioritize safety at every step.
Recap: The Three Pillars
- Preparation is Predictive: Site assessment, sub-base compaction, formwork precision, and tool readiness establish the conditions for success before a single drop of water is added.
- Placement is Observational: Read the concrete’s visual and tactile cues—sheen, resistance, surface condition—to time each step correctly. Work with the material’s natural progression.
- Protection is Essential: Curing is not optional maintenance; it is the chemical process that builds strength and durability. Consistent moisture and temperature control for 7+ days is the investment that ensures longevity.
Your 24-Hour Action
After finishing your pour and initiating curing, set a gentle reminder for 24 hours later. At that time, lightly press your thumb on an inconspicuous area. If it leaves only a faint mark with no moisture, light foot traffic is generally acceptable. But remember—curing continues. Maintain your curing method for the full recommended period. This small act of disciplined patience safeguards all your prior effort.
The Larger Perspective
Concrete connects us to a timeless tradition of building. From ancient Roman structures to modern infrastructure, this versatile material has shaped human environments for millennia. Today, you engage with the same fundamental substance, guided by accumulated knowledge and modern understanding. Each project you complete—whether a simple garden path or a functional foundation—builds not only a physical structure but also your skill, judgment, and confidence. Embrace the learning process. Note what works well. Adjust for next time. Share your experience. The ground you shape becomes a testament to thoughtful, capable hands.
Explore Our Complete System:
Mastering Masonry: A Beginner’s Guide to Brick and Stone | The Ultimate Deck Building Handbook: From Footings to Finish | Landscaping with Purpose: Drainage, Slope, and Soil Solutions | Workshop Wisdom: Essential Tool Maintenance for Longevity | Sustainable Outdoor Living: Permeable Pavers and Rainwater Harvesting | The DIY Home Inspector’s Checklist: Spot Problems Before They Cost You | Crafting with Confidence: Woodworking Projects for Every Skill Level