Stop Water Damage in Its Tracks—Learn Exactly When to DIY, When to Call a Pro, and How to Approach Repairs with Confidence and Care
Water stains blooming on your ceiling or gusts of wind revealing bare patches on your roof trigger immediate concern—and rightly so. A compromised roof affects structural integrity, indoor air quality, and long-term home value. Yet rushing into repairs without thorough diagnosis often wastes resources and introduces new risks. This guide delivers a systematic, safety-centered methodology for identifying, temporarily stabilizing, and thoughtfully addressing leaks and missing shingles on asphalt composition roofs—the most common residential roofing system across North America. Grounded in widely recognized industry protocols and safety standards, you’ll gain a clear framework to make informed decisions while avoiding common pitfalls encountered in roof repair efforts.
Introduction: Why Thoughtful Diagnosis Precedes Every Repair
Roof repairs falter not solely from technical errors, but from skipped assessment steps, underestimated hazards, and misaligned expectations about repair scope. Consider the homeowner who seals a ceiling stain after rain—only to discover weeks later the moisture originated from compromised chimney flashing several feet away. Or the well-intentioned DIYer who replaces a missing shingle without inspecting the underlying deck, inadvertently covering early-stage deterioration. These scenarios recur because fragmented advice often treats visible symptoms while overlooking interconnected causes.
This guide reframes roof repair as a diagnostic journey, not a isolated task. We integrate three critical dimensions frequently addressed separately elsewhere: safety protocols (stable access and hazard awareness), moisture tracing (following water paths beyond surface evidence), and material awareness (aligning techniques with shingle condition, climate exposure, and substrate status). By anchoring each step in observable evidence—not assumption—you transform uncertainty into purposeful action. Whether buying time before professional support arrives or executing a targeted repair yourself, this approach prioritizes your safety and your home’s long-term resilience.
References to standards from organizations like the National Roofing Contractors Association (NRCA) and International Residential Code (IRC) provide consistent benchmarks. These reflect collective industry learning—not abstract theory. When we note “minimum 6-inch lap coverage for step flashing” or “1-inch clearance between chimney and shingle edge,” these details address common failure points where minor gaps invite moisture intrusion. Precision in execution supports durability.
The Roof Health Assessment Framework: See Beyond the Surface
Before handling tools, adopt the Three-Layer Assessment Lens. This structured approach—aligned with professional inspection methodology—prevents narrow focus by evaluating escalating depths of condition:
- Surface Layer: Visible indicators (missing shingles, granule accumulation, debris buildup)
- Structural Layer: Substrate status (deck firmness, nail integrity, underlayment condition)
- Systemic Layer: Contributing factors (ventilation patterns, historical weather exposure, installation details)
Overlooking layers invites recurrence. A missing shingle (Surface) may stem from wind uplift due to original nailing patterns (Systemic), while the exposed deck shows early softening (Structural). Repairing only the shingle neglects underlying vulnerabilities—increasing future failure risk.
Applying the Framework: A Practical Walkthrough
You notice several missing shingles on the southwest slope following high winds.
– Surface Scan: Photograph the area in good light. Note adjacent shingle condition—are tabs lifting? Are nail heads visible? Check gutters for excessive granule buildup (a sign of aging).
– Structural Probe: From the attic, use a moisture meter or visual inspection on the deck beneath the damage. Gently press with a screwdriver tip; unusual softness suggests deterioration. Shine a flashlight upward on a sunny day; pinpricks of light indicate deck gaps.
– Systemic Audit: Review recent weather patterns. Was damage isolated or widespread? Assess roof age: shingles beyond 15 years often have reduced adhesive strength, affecting repair viability. Inspect nearby flashing at valleys, vents, or chimneys—frequently the actual moisture source misattributed to shingle loss.
The Fundamental Principle: Water travels horizontally before dripping vertically. A ceiling stain directly below a missing shingle may be coincidental. Always trace moisture paths upward along rafters from the interior evidence point.
This framework replaces urgency with method. You shift from “fixing a leak” to conducting a careful assessment where each observation guides the next step.
Safety First: Foundational Protocols for Roof Access
Roof work involves inherent hazards. Safety isn’t a preliminary step—it’s the prerequisite for every subsequent action. If protocols feel demanding, remember: no repair justifies compromised personal safety.
Ladder Setup: Stability Before Ascent
- Angle Guidance: Apply the 4:1 ratio—for every 4 feet of working height, position the ladder base 1 foot away from the wall. Verify: stand facing the ladder; your toes should touch the base while your arms extend straight to grip a rung at shoulder height.
- Secure Placement: Never rest the ladder directly against gutters—they can deform under load. Use ladder stabilizers (wide hooks spanning the gutter) or standoff brackets. Anchor the top securely to a verified structural point (e.g., sound chimney anchor—not loose vents).
- Ground Preparation: Clear grass, mud, or debris beneath ladder feet. Place ¾-inch plywood under feet on soft or uneven ground to prevent shifting. On sloped roofs, roof jacks with planks create a stable working zone.
Fall Awareness: Beyond “Being Careful”
Safety standards emphasize fall protection for work above modest heights. For homeowner contexts:
– Harness Consideration: If using a harness system, ensure it’s certified (ANSI Z359.11) and anchored to a structural roof anchor secured into rafters (located via stud finder), not sheathing alone.
– Lower-Slope Alternative: On gentle slopes (<4:12 pitch) with dry, clean surfaces, a ground-based assistant maintaining gentle tension on a non-stretch safety rope may offer supplementary awareness. This is not equivalent to professional fall protection and carries inherent risk.
– Weather Boundaries: Pause work immediately for wind, rain, dew, frost, or temperatures below 40°F (shingles become brittle; surfaces lose traction).
Tool and Material Handling
- Secure Tools: Attach hammers, knives, and caulk guns to your belt with lanyards. Falling objects pose serious hazards below.
- Material Transport: Hoist shingle bundles using a rope system anchored to a ground stake—never carry heavy loads up ladders.
- Overhead Awareness: Maintain ample distance from power lines. Assume all lines are energized.
Critical Reminder: If your roof pitch exceeds 6:12, shows moss/algae growth, has significant slope irregularities, or you feel uneasy at height—pause and consult a professional. This reflects prudent judgment, not hesitation. Your well-being is the priority.
Diagnosing the Source: From Attic Clues to Exterior Evidence
Accurate diagnosis prevents wasted effort. Follow this sequence to identify the true origin.
Step 1: Attic Inspection (Begin Here)
Ceiling stains mark endpoints, not origins. Enter the attic during or shortly after moisture exposure with a flashlight:
– Trace Pathways: Follow moisture trails upward along rafters. Look for:
– Discoloration or staining on wood surfaces
– Rust on nail heads (suggests repeated moisture exposure)
– Damp or compressed insulation (replace if saturated)
– Pinpricks of daylight (indicates deck gaps or missing underlayment)
– Map Observations: Note locations relative to roof penetrations (vents, chimneys). Staining near a plumbing vent often points to boot flashing issues—not shingle failure.
– Ventilation Check: Assess airflow. Stagnant, humid air accelerates deck deterioration. Ideal attic temperature should reasonably align with outdoor conditions.
Step 2: Exterior Roof Evaluation
Only proceed after confirming safe access. Work deliberately:
– Start Low: Examine eaves, gutters, and drip edges first. Clogged gutters force water under shingle edges—a frequent misdiagnosis as shingle failure.
– Systematic Scan: Use binoculars from ground level initially to identify large gaps. Then, on-roof (with safety measures):
– Missing Shingles: Note position relative to valleys, ridges, or penetrations. Clustered damage near valleys suggests wind-driven rain vulnerability.
– Shingle Condition: Gently lift adjacent tabs (wear gloves). Check for:
– Nail pops: Heads protruding >1/8 inch create moisture channels
– Cupping/curling: Tabs lifting at edges signal aging or ventilation issues
– Granule loss: Exposed asphalt areas indicate UV degradation; repair suitability diminishes
– Flashing Review: Focus on:
– Chimneys: Cracked mortar, separated step flashing
– Vents: Cracked rubber boots, gaps at base
– Valleys: Exposed metal, missing sealant
– Controlled Water Test (Dry Day Only): With an assistant monitoring the attic, use a garden hose starting at eaves and moving upward. Stop immediately when moisture appears internally. Never test near electrical components or in windy conditions.
Diagnostic Pathway Guide
Visible interior moisture? → YES → Attic inspection → Path leads to penetration? → YES → Prioritize flashing assessment
                          ↓ NO
                          Path leads to open deck area? → YES → Assess shingle/underlayment damage
                          ↓ NO
                          Stain near ridge? → Evaluate ridge cap condition and ventilation details
This structured approach reduces guesswork. Industry observations indicate that visible exterior damage is frequently not the primary moisture source—flashing details or deck conditions often play central roles.
Emergency Stabilization: Temporary Measures to Limit Impact
When active moisture threatens or weather looms, temporary actions can reduce escalation. These are short-term measures only—not permanent solutions.
Tarping a Compromised Section
Goal: Divert water away from exposed areas.
Materials: 6-mil polyethylene tarp (min. 10’x12′), 2×4 lumber strips, roofing nails, hammer, utility knife
Steps:
1. Clear loose debris near the area. Avoid stepping directly on compromised deck sections.
2. Unfold tarp uphill of the damage. Overlap the affected zone by 3+ feet on all sides.
3. Secure the top edge first: Place a 2×4 strip over the tarp’s upper edge. Nail through wood/tarp into solid deck every 12 inches.
4. Stretch tarp taut downhill. Secure sides/bottom with additional 2×4 strips. Avoid nailing through the tarp center—this creates new entry points.
5. In high-wind conditions, seal edges lightly with roofing cement.
Key Consideration: On sloped roofs, orient tarp seams to shed water away from the damage zone. Near valleys, extend coverage across the valley to prevent channeling.
Interior Moisture Management (Attic)
For immediate drip control while arranging repairs:
– Clean the deck area around the moisture point with isopropyl alcohol.
– Apply a small amount of silicone-based roof sealant to the underside of the deck. Press gently to fill visible gaps.
– Place a container below, but recognize this is strictly interim. Sealants degrade under temperature shifts.
Avoid These Common Missteps:
– ❌ Stuffing rags or towels into leaks (traps moisture, accelerates deterioration)
– ❌ Applying sealants to wet or dirty surfaces (adhesion fails quickly)
– ❌ Using duct tape or household caulk (degrades rapidly; leaves residue)
Temporary measures typically provide limited protection—often days, depending on weather. Document the area with photos to support your repair plan or contractor discussion.
Permanent Repair: Replacing Missing Shingles on Asphalt Roofs
Applies to composition/asphalt shingle roofs under approximately 15 years old with verified solid deck substrate.
Tool & Material Preparation
| Category | Essential Items | Helpful Additions |
|---|---|---|
| Tools | Flat bar, hammer, utility knife, chalk line, caulk gun, roofing nails (1¼”), ladder stabilizer | Nail puller, shingle cutter, magnetic nail sweeper |
| Materials | Matching shingles (purchase extras), roofing cement, replacement nails | Ice & water shield (for eaves/valleys), self-sealing nails |
| Safety | Non-slip footwear, gloves, safety glasses, secure ladder setup | Roof brackets, tool lanyards |
Matching Shingles Tip: Bring a sample to suppliers. Note any manufacturer markings (often on the back), color name, and lot number. If exact matches are unavailable, “weathered” or “aged” tone shingles often blend more naturally than bright new ones. Store extras for future touch-ups.
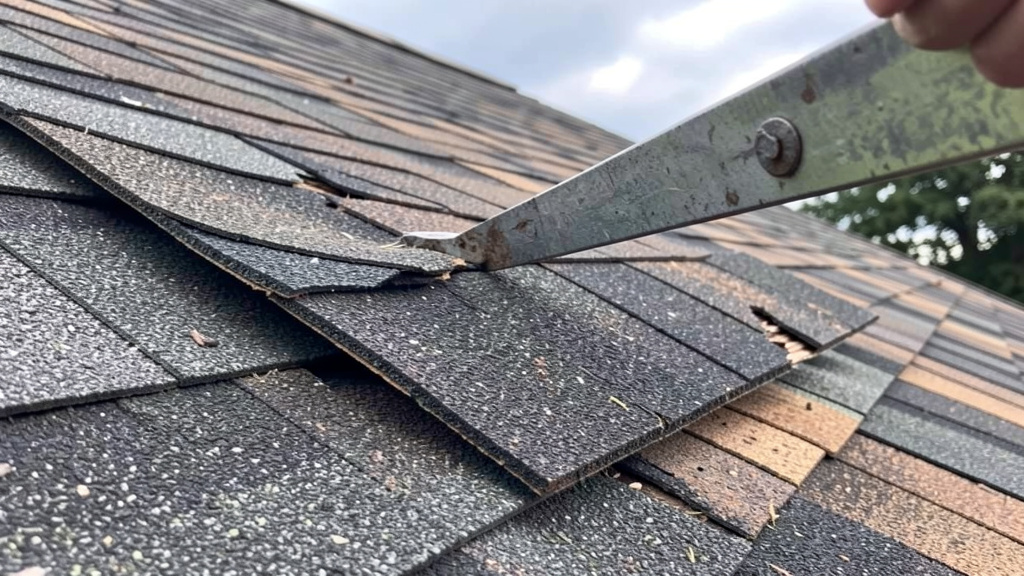
Step-by-Step: Single Shingle Replacement
Rationale: This method isolates repair without disturbing surrounding shingles’ sealed bonds.
- Site Preparation:
- Work on a dry day with ambient temperatures between 60–80°F. Cold shingles crack easily; hot ones tear.
-
Clear debris. Inspect the deck beneath the missing shingle: probe gently with a screwdriver. If softness is detected, pause—address deck condition first (see Structural Layer section).
-
Removing Damaged Material (If Partially Attached):
- Slide a flat bar under the tab of the shingle above the damaged area. Lift gently to release sealant.
- Insert flat bar under the damaged shingle to expose nail heads.
-
Remove nails carefully with hammer claw or nail puller. Avoid forceful pulling—adjacent shingles can tear.
-
Installing the New Shingle:
- Slide the new shingle into place under the upper shingle’s tabs. Align edges precisely with neighbors.
- Nail placement matters: Drive four nails just below the adhesive strip (visible as a darker band):
- Two nails approximately 1 inch above cutout slots
- Two nails about ½ inch from side edges
- Nails should penetrate the deck sufficiently without splitting wood
-
Press the upper shingle tab down firmly. Apply a pea-sized dot of roofing cement under each tab corner to reseal. Avoid excess cement—it oozes, attracts debris, and appears unrefined.
-
Final Verification:
- Confirm no nail heads protrude.
- Ensure the shingle lies flat with surrounding courses—no buckling or gaps.
- Sweep the area thoroughly for nail debris (a magnetic sweeper helps).
Addressing Multiple Missing Shingles or Wind Damage
When several shingles are missing or tabs are torn:
– Remove a Row Section: Carefully lift the entire row of shingles above the damage using the flat bar technique. Remove all damaged material and nails.
– Inspect Underlayment: Check felt paper for tears. Patch small holes with roofing cement; replace larger sections with new felt (overlap seams 6+ inches).
– Reinstall Shingles: Begin from the lowest row. Slide new shingles under the upper row’s tabs. Nail precisely. Re-seal upper row tabs with minimal cement dots.
– Valley Proximity: If damage occurs within 12 inches of a valley, replace shingles on both sides. Valleys manage high water volume—partial repairs often fail prematurely.
Common Execution Challenges
- Nail Placement: Nails too high (exposed), too low (puncturing sealant strip), or insufficient quantity increase wind vulnerability.
- Temperature Sensitivity: Installing below 45°F limits sealant activation. In cooler conditions, apply roofing cement under tabs and use self-sealing nails.
- Visual Mismatch: New shingles on aged roofs create noticeable patches. If damage affects more than a small isolated area, consult a professional about section replacement for uniformity.
- Deck Oversight: Installing over compromised deck traps moisture. Always verify substrate integrity first.
Permanent Repair: Addressing Leaks at Flashing and Penetrations
Moisture intrusion frequently originates at roof penetrations. Precision here significantly impacts long-term performance.
Chimney Flashing Assessment and Repair
Indicators: Interior staining near chimney, dampness observed in attic around brick.
Materials: Replacement step flashing (pre-bent L-shaped metal pieces), roofing cement, masonry nails, trowel, mortar repair compound (if needed)
Process:
1. Access the Area: Carefully lift shingle tabs above the chimney. Remove nails securing old flashing. Slide out damaged pieces.
2. Inspect Substrate: Check deck condition under flashing. Scrape away deteriorated mortar from the chimney crown.
3. Install New Step Flashing:
– Slide the first piece under the shingle tab and against the chimney face. Nail only to the roof deck (not chimney) with two roofing nails.
– Apply fresh mortar between flashing and brick.
– Install the next shingle course. Slide the second flashing piece over the first, under the new shingle. Stagger joints like brickwork.
– Continue upward. Each piece must overlap the one below.
4. Crown Maintenance: Seal hairline cracks in the chimney crown with elastomeric sealant. For chimneys wider than 30 inches, a cricket (small peaked diverter) helps channel water away.
Why Step Flashing Works: This layered method accommodates roof movement better than single-piece counter-flashing, aligning with modern installation guidance for durability.
Plumbing Vent Boot Replacement
Indicators: Circular staining around vent pipe in attic, visible cracks in rubber boot.
Materials: New vent boot (match pipe diameter: 1.5″, 2″, 3″), roofing cement, utility knife, hammer
Steps:
1. Cut away the old boot rubber carefully. Remove securing nails.
2. Clean the pipe base and deck surface. Remove old cement residue.
3. Slide the new boot over the pipe. Ensure the metal base sits flush on the deck.
4. Nail the boot base every 3 inches with roofing nails.
5. Seal the entire perimeter with roofing cement. Smooth edges gently.
6. Critical Detail: Apply extra sealant along the uphill side of the boot where water pressure concentrates during rain.
Consideration: Upgrading to a boot with an adjustable collar and integrated sealant reservoir offers enhanced longevity for modest additional cost.
Valley Leak Attention
Indicators: Staining along valley lines, accelerated granule loss within the valley.
Valleys manage concentrated water flow. Repairs require extra care:
1. Remove shingles within 18 inches of the valley center on both sides.
2. Inspect underlayment. Replace torn sections with ice & water shield (self-adhering membrane). Overlap seams 6+ inches.
3. Reinstall shingles using the “closed-cut” method:
– Trim shingle tabs to fit precisely along the valley line.
– Maintain a ½-inch gap between shingle edges on opposite sides—never let shingles touch within the valley. This gap allows water passage.
– Seal cut edges lightly with roofing cement.
4. For extensive damage, installing metal valley flashing (W-shaped) over underlayment before shingles provides robust protection.
Structural Layer: Addressing Deck Condition
Installing new materials over compromised decking is ineffective. Substrate integrity is foundational.
Recognizing Deck Concerns
- Visual Cues: Dark staining, visible cracks, sagging between rafters
- Physical Check: Screwdriver penetrates wood with minimal pressure
- Sound Test: Hollow tone when tapped lightly with a hammer
Small-Scale Deck Repair (<1 sq ft)
Materials: Circular saw, replacement plywood (matching existing thickness—typically ½”), construction adhesive, deck screws, roofing cement
Procedure:
1. From the attic, mark the affected area boundaries on the deck underside.
2. On the roof, cut out the damaged section with a circular saw set to exact deck thickness (avoid cutting rafters). Cut a square or rectangular shape for easier patching.
3. Remove debris. Clean the opening thoroughly.
4. Cut replacement plywood to fit snugly. Apply construction adhesive to edges.
5. Insert the patch. Secure with deck screws driven into rafters (locate rafters first with a stud finder).
6. Seal patch edges with roofing cement. Proceed with shingle repair over the patch.
When Professional Assessment Is Advised
- Affected area exceeds approximately 2 sq ft
- Damage occurs near the roof ridge or load-bearing walls
- Multiple soft spots suggest widespread moisture history
- Uncertainty exists about structural soundness or repair technique
Deck repair demands precision. An improperly fitted patch can create new vulnerabilities. When in doubt, professional evaluation is a wise investment.
Systemic Layer: Supporting Long-Term Roof Health
Addressing symptoms alone invites recurrence. Integrate these supportive practices:
Ventilation Review
Inadequate airflow traps heat and moisture, stressing shingles from below.
– Intake Vents: Ensure soffit vents are unobstructed (no insulation blocking). Hold tissue paper against the vent—if it doesn’t adhere gently, airflow may be restricted.
– Exhaust Vents: Verify ridge vents run the roof length; turbine vents spin freely.
– Balance Check: General guidance suggests 1 sq ft of net free vent area per 300 sq ft of attic floor space. Consult local codes for specifics. Add vents if significantly deficient.
Ice Dam Mitigation (Cold Climates)
Ice dams form when attic heat melts snow that refreezes at cold eaves.
– Short-Term: Install heat cables along eaves before winter arrives.
– Long-Term:
– Increase attic insulation (target R-38 or local recommendation) to reduce heat loss
– Seal attic air leaks around lights, ducts, and hatches
– During repairs near eaves, consider adding ice & water shield underlayment (first 24 inches)
Vegetation and Debris Management
- Trim tree branches to maintain at least 10 feet of clearance from the roof surface.
- Install gutter guards suited to your environment to reduce clogs that force water under shingles.
- Clear valleys seasonally—organic debris traps moisture against shingles.
Recognizing When Repair Reaches Its Limit
Understanding repair boundaries protects your investment and safety.
Indicators Suggesting Professional Evaluation
- Age and Extent: Roof beyond 20 years with widespread shingle deterioration (curling, granule loss, multiple missing sections).
- Recurring Moisture: Same area shows moisture repeatedly after proper repair attempts—suggests deeper systemic issues.
- Visible Sagging: Noticeable dip in the roof plane between rafters indicates structural concern. If observed, avoid the area below and seek engineering assessment.
- Multiple Light Points: Numerous pinpricks of daylight visible from the attic signal widespread deck deterioration.
- Attic Mold/Mildew: Persistent black streaks on rafters or insulation reflect chronic moisture beyond surface leaks.
Decision Support Framework
| Scenario | DIY Material Estimate | Professional Estimate | Replacement Context | Guidance Consideration |
|---|---|---|---|---|
| 1–2 missing shingles, solid deck | $15–$40 | $150–$350 | $8,000–$15,000+ | DIY may be suitable with safety confidence |
| Valley concern + minor deck issue | $80–$150 | $500–$1,200 | $8,000–$15,000+ | Professional assessment recommended for deck work |
| Multiple missing shingles, aged roof | $200–$400 | $1,200+ | $8,000–$15,000+ | Obtain multiple replacement consultations |
| Recurring issues, roof >20 years | N/A | Varies | $8,000–$15,000+ | Replacement planning is often prudent |
Note: Cost estimates are approximate and vary significantly by region, roof complexity, and local labor markets.
Guideline: If repair costs approach 25% of replacement value and the roof is nearing typical service life, replacement may offer better long-term value.
Engaging Professional Support
When seeking estimates:
– Request detailed proposals specifying materials (shingle brand/model), scope (tear-off vs. overlay), and warranty terms.
– Verify current licenses, insurance (liability and workers’ compensation), and references. Check standing with local roofing associations.
– Ask targeted questions: “Will damaged decking be replaced? What underlayment is specified? Is ice & water shield included on vulnerable areas?”
– Exercise caution with unsolicited offers after storms. Reputable contractors provide clear timelines without high-pressure tactics.
Seasonal Maintenance: A Practical Year-Round Rhythm
Consistent, modest attention prevents major issues. Integrate this manageable cycle:
Spring (Post-Winter Review)
- [ ] Scan for wind damage or missing shingles
- [ ] Clear gutters and downspouts of debris
- [ ] Inspect flashing around chimneys and vents for separation
- [ ] Trim branches encroaching on the roof
Summer (Pre-Storm Readiness)
- [ ] Check gutters for granule accumulation (indicates shingle aging)
- [ ] Verify attic ventilation airflow
- [ ] Inspect sealant around penetrations; refresh if cracked
- [ ] Address moss/algae with oxygen bleach solution (never chlorine bleach) or install zinc strips at the ridge
Fall (Pre-Winter Preparation)
- [ ] Clear leaves and debris from valleys and eaves
- [ ] Install heat cables if ice dams are a historical concern
- [ ] Conduct a final attic check for new moisture signs
- [ ] Ensure soffit vents remain unobstructed
Winter (Observation Only)
- [ ] Monitor for ice dam formation after snow events
- [ ] Check interior ceilings for new stains following heavy snow
- [ ] Never attempt roof access in winter conditions—use binoculars for visual checks from ground level
Maintenance Documentation Tip: The Roof Log
Keep a simple dated record with photos after each inspection. Note:
– Date and nature of any repairs
– Observations on shingle condition
– Attic inspection findings
– Contractor contacts and warranty details
This log builds valuable history for future decisions and warranty validation.
Navigating Repair Choices: DIY, Professional Help, or Replacement
Clarity around options supports confident decisions.
Understanding Repair Scenarios
| Repair Focus | DIY Material Range | Professional Range | Time Commitment | Complexity Notes |
|---|---|---|---|---|
| Single shingle replacement | $15–$40 | $150–$350 | 45–90 mins | Low complexity if deck is sound and access is safe |
| Chimney flashing attention | $80–$150 | $400–$900 | 3–5 hours | High precision required; professional often preferred |
| Vent boot replacement | $20–$50 | $150–$350 | 60–90 mins | Moderate; requires careful sealing |
| Small deck patch (<1 sq ft) | $40–$80 | $300–$600 | 2–4 hours | Structural implication; professional assessment wise |
Considering DIY Realities
- Tool Investment: Basic tools may require purchase; specialized items add cost.
- Learning Curve: Incorrect technique (e.g., nail placement) can create new vulnerabilities.
- Time and Conditions: Weather windows are narrow; rushed work increases error risk.
- Warranty Considerations: Some manufacturer warranties require certified installation for validity—verify before proceeding.
Situations Where Professional Support Adds Clear Value
- Repairs involve flashing, valleys, or structural elements
- Roof pitch is moderate to steep (>6:12)
- Safety concerns exist regarding access or conditions
- Time constraints increase pressure and error potential
- Roof is under active warranty requiring certified labor
Balanced Approach: Some homeowners hire a professional for high-skill elements (flashing, deck repair) and handle straightforward shingle replacement under guidance. Many contractors offer consultation-only services for modest fees.
Your Questions, Answered
Q: Can shingle repairs be done in cooler weather?
A: Below 45°F, shingle sealant strips activate poorly. Repairs are possible but require roofing cement under every tab and self-sealing nails. Work deliberately—cold shingles are brittle. Avoid roof access if surfaces are icy or frosty. For freezing conditions, temporary stabilization (like tarping) is safer until temperatures rise.
Q: How can I match shingles if the original product is discontinued?
A: Bring a sample to specialty roofing suppliers—they may have close matches or weathered alternatives. Install new shingles on less visible slopes if possible. For larger repairs, replacing an entire roof section (e.g., one plane) improves visual consistency.
Q: Will homeowner’s insurance cover wind-related shingle loss?
A: Coverage typically applies to sudden, accidental damage (like storms), not gradual wear. Document damage thoroughly with dated photos before temporary fixes. Review your policy’s wind/hail deductible (often a percentage of dwelling coverage). Obtain a contractor’s repair estimate before filing to determine if the claim exceeds your deductible.
Q: How long does roofing cement take to set?
A: A surface skin forms in 1–2 hours, but full curing takes 24–72 hours depending on temperature, humidity, and application thickness. Avoid disturbing sealed areas during this period. Apply sparingly—excess remains tacky and collects debris.
Q: Can moss be treated without roof replacement?
A: Surface moss can often be addressed without replacement. Mix oxygen bleach (not chlorine) with water per label instructions. Apply gently, wait 15 minutes, rinse with low-pressure water. Never power wash—it damages granules. Install zinc or copper strips at the ridge; rainwater carries ions that inhibit regrowth. If moss has lifted shingles or caused deck softening, localized repair is needed.
Q: Why do leaks sometimes appear days after rain ends?
A: Water moves slowly through insulation and framing. A stain visible Tuesday may originate from Saturday’s rain. This delay complicates diagnosis. Inspecting during light rain (safely from the attic) or using the controlled hose test helps pinpoint sources. Moisture meters detect hidden dampness before stains emerge.
Q: Are “peel-and-stick” shingle patches reliable long-term?
A: These are strictly for temporary emergency use (typically under two weeks). They lack structural integrity for permanent repair. Wind lifts edges; UV exposure degrades adhesive. Never rely on them permanently—they can trap moisture and accelerate underlying damage.
Q: How should old shingle debris be disposed of responsibly?
A: For small repairs, bag debris securely and follow municipal bulk waste guidelines. For larger projects, rent a small dumpster (check local regulations). Contact landfills beforehand—some accept asphalt shingles for recycling. Never burn shingles—toxic fumes violate environmental regulations.
Q: What’s the difference between roofing cement and roof sealant?
A: Roofing cement (asphalt-based) is thick, used for bonding shingles or flashing patches. Roof sealant (silicone or polyurethane) remains flexible, ideal for sealing joints around vents or chimneys. Household caulk lacks UV resistance and roof-specific flexibility—avoid substitution.
Q: Is installing new shingles over existing ones ever advisable?
A: Building codes sometimes permit one layer over existing shingles if the deck is sound, structure supports added weight, and local regulations allow. However, it conceals underlying issues, complicates future repairs, and may void warranties. Most professionals recommend full removal for optimal longevity. Never install over curled, buckled, or damaged shingles.
Conclusion and Next Step
Roof care blends respect for complexity with practical action. By applying the Three-Layer Assessment Framework, you move from reactive concern to informed stewardship. You now have a reliable methodology to:
1. Diagnose thoughtfully by tracing moisture beyond surface clues
2. Prioritize safety with clear protocols that protect you first
3. Execute deliberately using techniques aligned with material science
4. Decide wisely between repair paths, professional support, or replacement planning
The most meaningful action isn’t always the shingle replaced today—it’s the proactive check that prevents tomorrow’s issue.
The 24-Hour Action
Within the next day, spend 10–15 minutes in your attic with a flashlight. Look for:
– New discoloration or moisture trails on rafters
– Pinpricks of daylight near the roof deck
– Rust on nail heads or damp spots in insulation
Capture a photo with your phone. This simple step builds foundational awareness that supports your home’s resilience for years.
The Broader Perspective
Your roof functions as an integrated system—it breathes, expands, sheds water, and withstands environmental forces. Honoring its complexity through consistent, informed care transforms maintenance from a chore into an act of stewardship. Each inspected flashing joint, each cleared gutter, each documented observation reinforces your home’s integrity and your peace of mind.
Explore Our Complete Home Resilience System:
Understanding Roof Warranties: Manufacturer vs. Workmanship Coverage | Attic Ventilation Mastery: Calculating Net Free Area for Your Climate | Gutter Guardians: A Comparative Guide to Leaf Filters, Screens, and Helmets | Ice Dam Defense: Proven Strategies for Northern Climates | The Homeowner’s Emergency Prep Kit: Beyond the Roof Leak | Seasonal Home Checkup: A Room-by-Room Maintenance Calendar | Decoding Contractor Estimates: What to Look For and Questions to Ask